MENU

Free Pattern: Water Babies!

You’re in for a real treat today: a free pattern!  As a policy, I rarely make free patterns, but Jordana Paige sweet-talked me into creating one last year.  Since it’s the heat of summer, I thought this would be the perfect repost, a sweet little something for kids and adults alike to enjoy.  Quick to make up, you can use these as intended and inflate a water balloon (either with water or air) to use as stuffing, or you can stuff and have as a forever-stuffed animal.
When I was younger and my mother needed something to keep my
siblings and I occupied, she’d make water babies.  Filling balloons with water, she’d hand us
markers and we’d go to town, decorating our water babies, taking boxes lined
with tissue to make beds, and making various outfits for them.  Inevitably, though we’d drop the balloon on
the grass, or it would brush up against the edge of paper or something else
sharp, and our beloved water babies would be gone – popped in a rush of water.
Being an enterprising young child, I decided that my water
babies needed an outfit, a protective cover to protect it from the world.  Being handy with a hook, I made small bags
that my balloon would rest in, to be protected. 
Over time these developed into quite elaborate creatures in their own
right.
And then, I grew up and forgot about them.
Recently, however, these water baby costumes were brought
back to mind.  I have two young girls in
my life, and they were playing with water babies the other week.  Inevitably, one got dropped on the hot
asphalt, and burst… leading to some quite natural tears.  I decided it was time for me to break out my
hook and an old idea, and give it a new twist.
And so, I present to you, a modern twist on my 20 year old
water baby pattern.
Free Pattern Water Baby
MATERIALS
Gauge: 7 sts and 6 rows equal 1”
Hook: F/5 3.75 mm
Yarn: Worsted weight yarn, 4 colors plus black and white.
C1: Dark Blue
C2: Green
C3: Red
C4: Light Blue
INSTRUCTIONS
Using C1, Create sloppy slip knot, sc 2.
Round 1: 6 sc in circle. (6 sts)
Round 2: *sc twice in next st. Repeat from * 6 times total.
(12 sts) Join to next st with sl st. BO.
Round 3: Switch to C2. *sc twice in same st, sc in next st,
repeat from * 6 times total.(18 sts)
Round 4: Switch to C3. *sc twice in same st, sc in next 2
sts, repeat from * 6 times total. (24 sts)
Round 5: *sc twice in next st, sc in next 3 sts, repeat from
* 6 times total. (30 sts)
Round 6: *sc twice in next st, sc in next 4 sts, repeat from
* 6 times total. (36 sts)
Round 7: Switch to C4. *sc twice in next st, sc in next 5
sts, repeat from * 6 times total. (42 sts)
Round 8: Switch to C1. *sc twice in next st, sc in next 6
sts, repeat from * 6 times total. (48 sts)
Round 9: *sc twice in next st, sc in next 7 sts, repeat from
* 6 times total. (54 sts)
Round 10: *sc twice in next st, sc in next 8 sts, repeat
from * 6 times total. (60 sts)
Round 11-12: *sc twice in next st, sc in next 14 sts, repeat
from * 4 times total. (60 sts)
Round 13-16: Switch to C2. Sc all around.
Round 17: *sc2tog, sc in next 8 sts, repeat from * 6 times
total. (54 sts)
Round 18: *sc2tog, sc in next 7 sts, repeat from * 6 times
total. (48 sts)
Round 19: *sc2tog, sc in next 6 sts, repeat from * 6 times
total. (42 sts)
Round 20: Switch to C3. *sc2tog, sc in next 5 sts, repeat
from * 6 times total. (36 sts)
Round 21: *sc2tog, sc in next 4 sts, repeat from * 6 times
total. (30 sts)
Round 22: Switch to C1. *sc2tog, sc in next 3 sts, repeat
from * 6 times total. (24 sts) At this point you should stuff your orange ball.
Round 23: *sc2tog, sc in next 2 sts, repeat from * 6 times
total. (18 sts)
Round 29: *sc2tog, sc in next st, repeat from * 6 times
total. BO. (12 sts)
Ears:
Using Green, foundation double crochet 12 sts. Bind off. Tie
a knot in one end, use the tail to attach the other end to the water baby.
Eyes:
Using White: Create sloppy slip knot, sc 2.
Round 1: 6 sc in circle. (6 sts)
Round 2: *sc twice in next st. Repeat from * 6 times total.
(12 sts) Join to next st with sl st. BO.
Round 3: Join C2, ch 1. *sc twice in same st, sc in next st,
repeat from * 6 times total. Join to Ch 1 with sl st. BO.(18 sts)
Using Black: Create a sloppy slip knit, sc 2.
Round 1: 6 sc in circle. BO. (6 sts)
Nose:
Using C2: Create sloppy slip knot, sc 2.
Round 1: 6 sc in circle. (6 sts)
Round 2-3: Sc all around.

Assembly: Sew eyes, nose and ears to water baby. Insert a
balloon into the back, fill with water or air. Tie balloon end in knot and
play!

From the Business Desk: Finishing Projects

After a delay due to some career changes that Jen talked about earlier, From the Business Desk is back.  From the Business Desk is a semi-regular series that looks at some of the important factors in running a Small Fiber Arts Business.  This feature revolves around ensuring that all of your business projects have fully completed.


As a small business owner, staying on top of everything necessary to run your business is no small task.  With a constant turmoil of new projects, new customers, and everyday business inquiries, it is important to understand what is required for you to close out your existing projects; by successfully and formally closing out a project, it can be put to rest with all parties comfortable that their requirements have been met.

Not all Project Management needs to be this complicated. A few
simple tips can keep you on track to successful completion.
Source: http://en.wikipedia.org/wiki/Gantt_chart

One of the first items to be aware of in the closing stage of a project is that it’s important to identify up front what the final items on your project or to-do list are.  For example, if you are working on establishing and running a new class at your shop, you may think that the project is complete when the class runs.  Thinking this out ahead of time can help you identify  items that are always good to check off before putting a project to bed  Namely, ensuring that all compensation and contractual terms have been met and a project post-mortem to document lessons learned.  Following through with these steps ensures that you don’t forget some of the important elements of a project for any business: getting paid, and meeting legal obligations.  A post-mortem, either publicly or internally is a good time for one or more parties involved to learn from the project, documenting what went well and what could use improvement for next time.

This is an example of using Insightly to keep track of project tasks.
This is the project list for the pattern Sweet Strawberries.

Keeping track of all of this can be overwhelming; fortunately there are several options available that are easy to use in web form.  I’d recommend ZOHO Projects or Freedcamp as two of the better solutions available out there for someone just getting started.  Other options include systems that link Customer Relationship Management and Project Management.  Here at Tinking Turtle, our CRM system, Insightly includes an integrated Project Management module.  This provides additional functionality to link projects to various associated parties, and track when a project is waiting on a third party to take action.

No matter how extensive or basic your knowledge of projects is, ensuring that you take some time on all of your projects to double check that your steps are completed is well worth the peace of mind..  The more projects that can be completed without final steps left un-done, the easier managing the entire workload of your business can be.

~ Mr. Turtle

A handy tutorial on Duplicate Stitch

Note: I’m on vacation this week!  Some of these posts were originally done for Jordana Paige’s blog, but the rights have reverted back to me so I’m free to publish them myself.  The original post has been edited for clarity.
I was recently reminded of duplicate stitch when I was
working on a pair of color-work socks (I can now reveal: these were a stitch on the bottom of my Octopodes Socks!). I realized that I’d managed to knit the
wrong color in a part of the pattern.  I
practically cried.  I was nearly done
with the sock, and I certainly didn’t want to pull back to nearly the middle to
fix the mistake.  But the mistake was
also terribly noticeable–in fact, I was surprised I hadn’t noticed it before
then.
 After taking a few
deep breaths, and saying a few choice words, I gave some different solutions thought.  I settled on duplicate stitch.  What I ended up doing was covering the
original stitches with stitches in the right color, so it looked like I’d worked the correct color the whole time. 
The area was marginally thicker, but not very noticeable.  I was pleased with the result.
 Duplicate stitch is
most often used to add color to knitting when you don’t want to do complicated
color work, like intarsia or stranded knitting (though duplicate stitch can
also be used in conjunction with them, so you aren’t holding too many
colors).  It can be used to fix mistakes,
as I did, or it can be used to embellish or embroider a knit fabric–perhaps a
sweater that you want to mod.  I’ve been
thinking about doing something to do with scrollwork, vines or some sort of
black and white illustration on an old sweater I have to liven it up.
The duplicate stitch
is basically done by tracing the knit stitches. 
Today we’ll just be focusing on stockinette, though it can be done, with
mixed results, on garter or reverse stockinette.  You’ll need a contrasting color yarn and a
blunt-tip needle. 
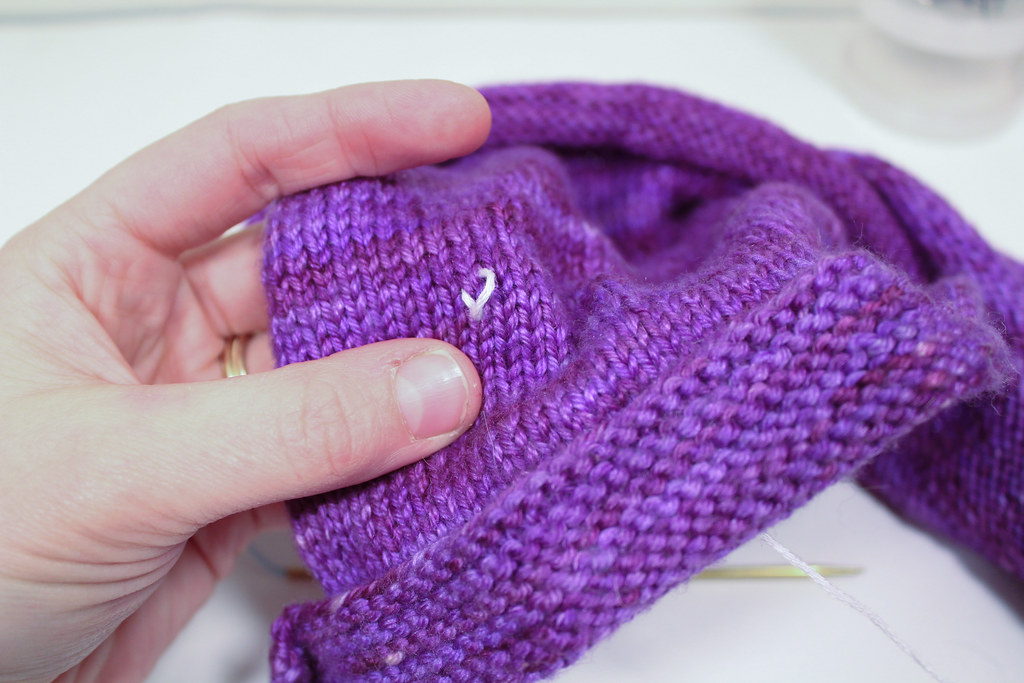
Let’s first take a
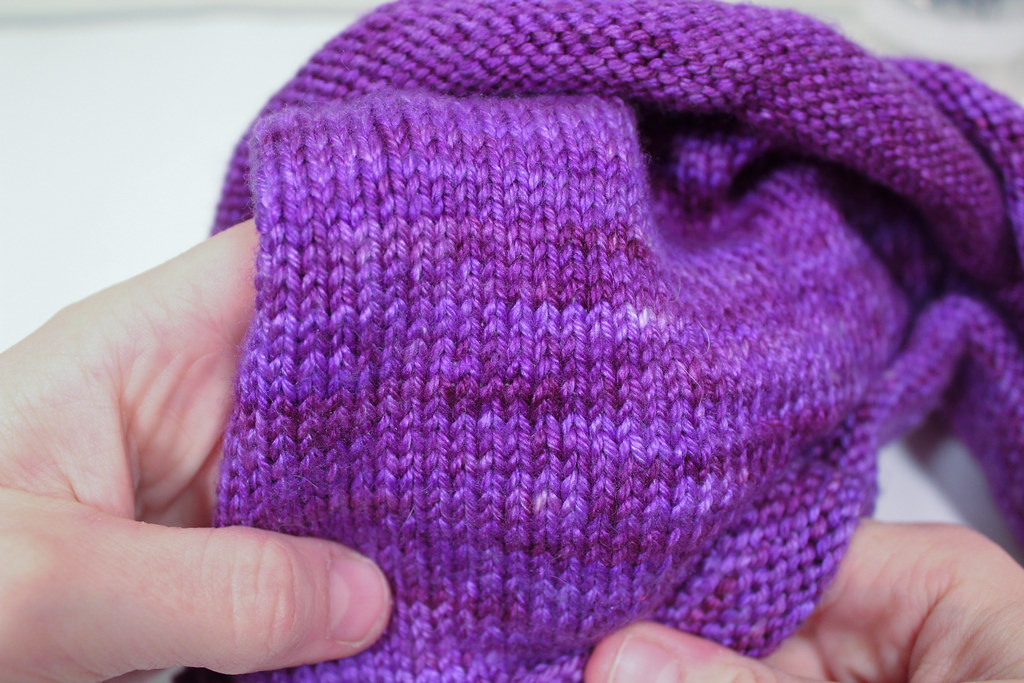
careful look at the knit stitches in stockinette.  See how they look like zigzags stacked on top
of each other?  I like to think of them
as an army of “V”s standing shoulder to shoulder.  Each “V” is an individual knit stitch.
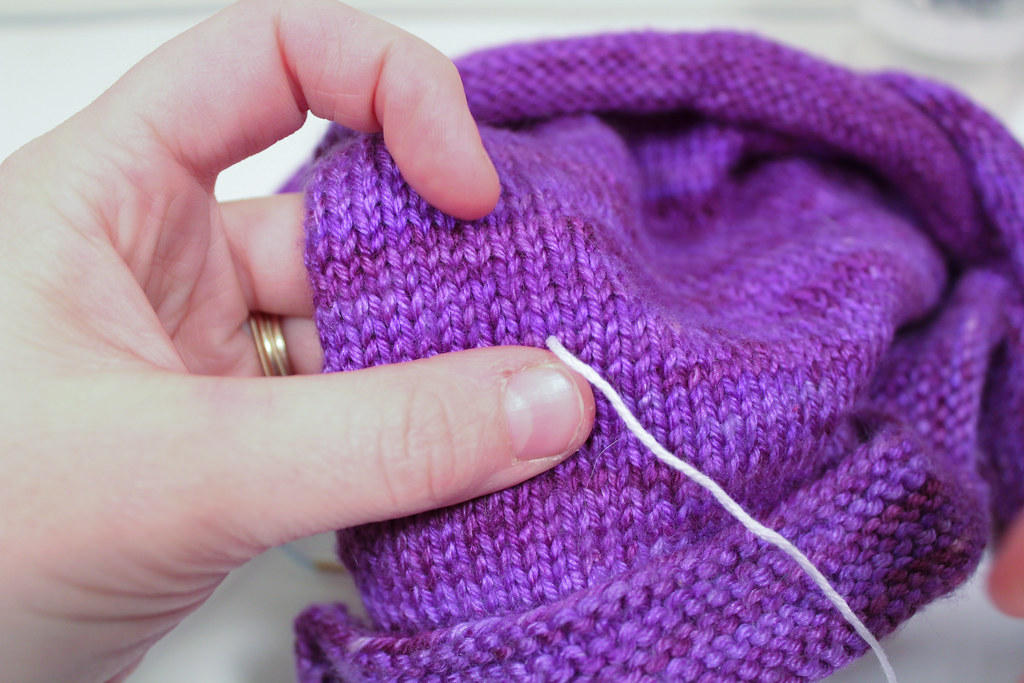
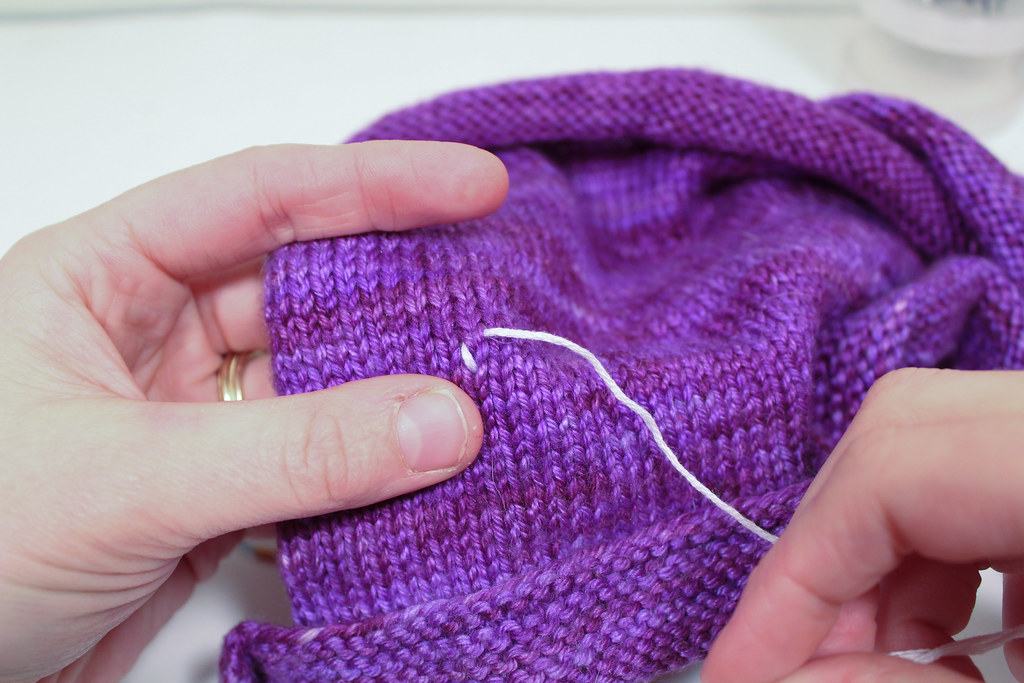
Thread your needle and insert it in the base of the V where
you want to start your design.  I find it
easiest to work from the bottom left and work up and to the right, though your
mileage may vary.
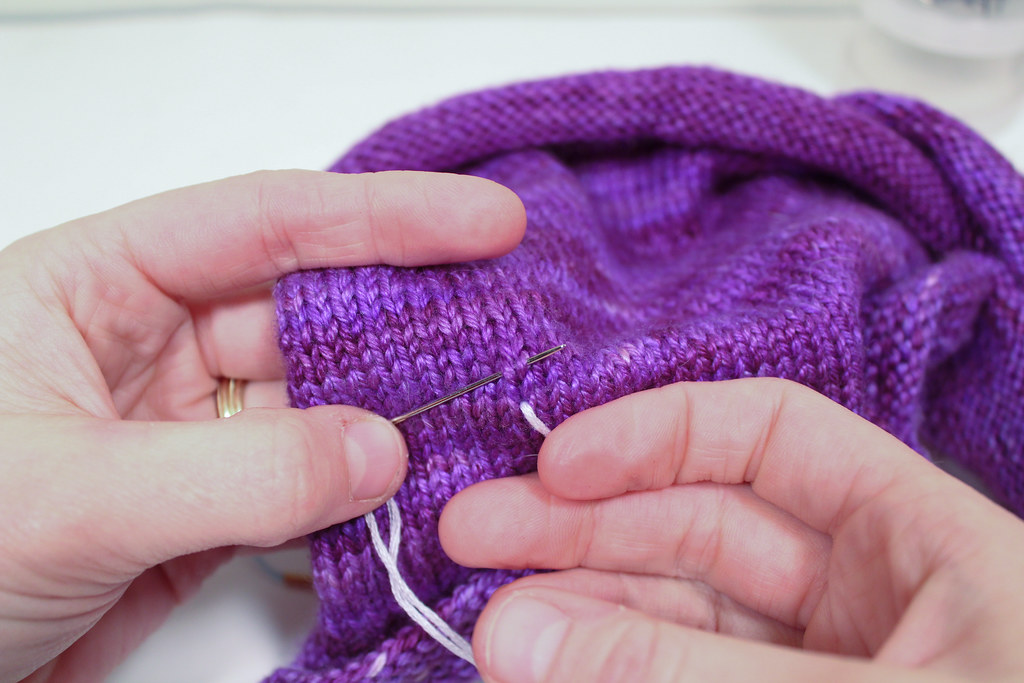
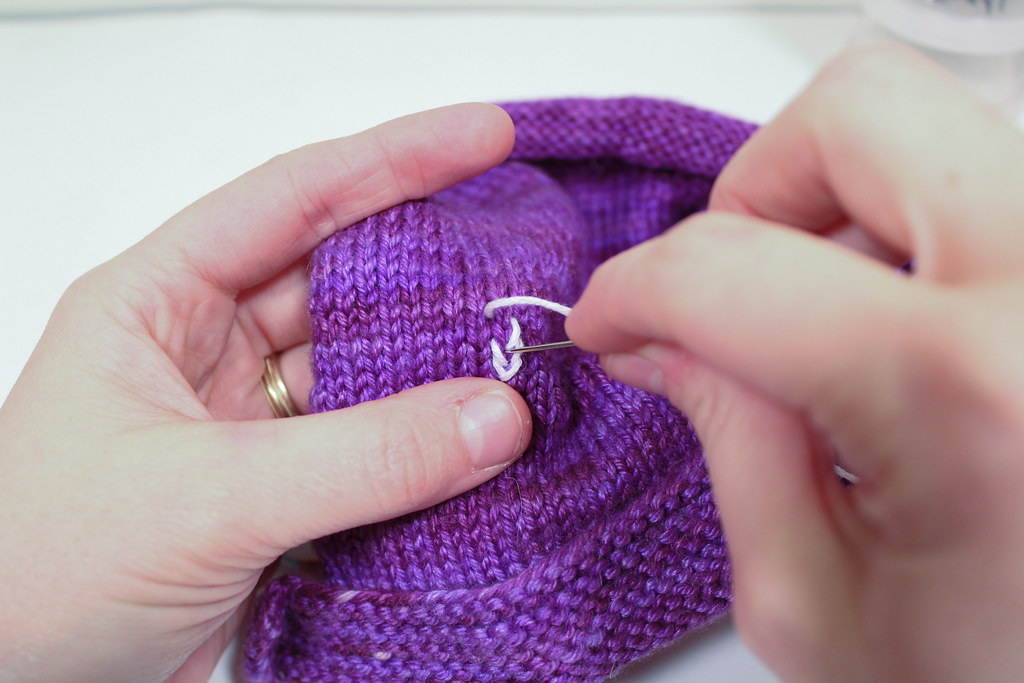
Now, insert your needle down through the top of one side of
the “V” and up through the other side, like so.
Pull through.
Finally, insert your needle into the base of the “V” again,
where you first came up through the fabric. If you need to, adjust the tension
of the yarn so it matches the tightness, or gauge, of the rest of the fabric.
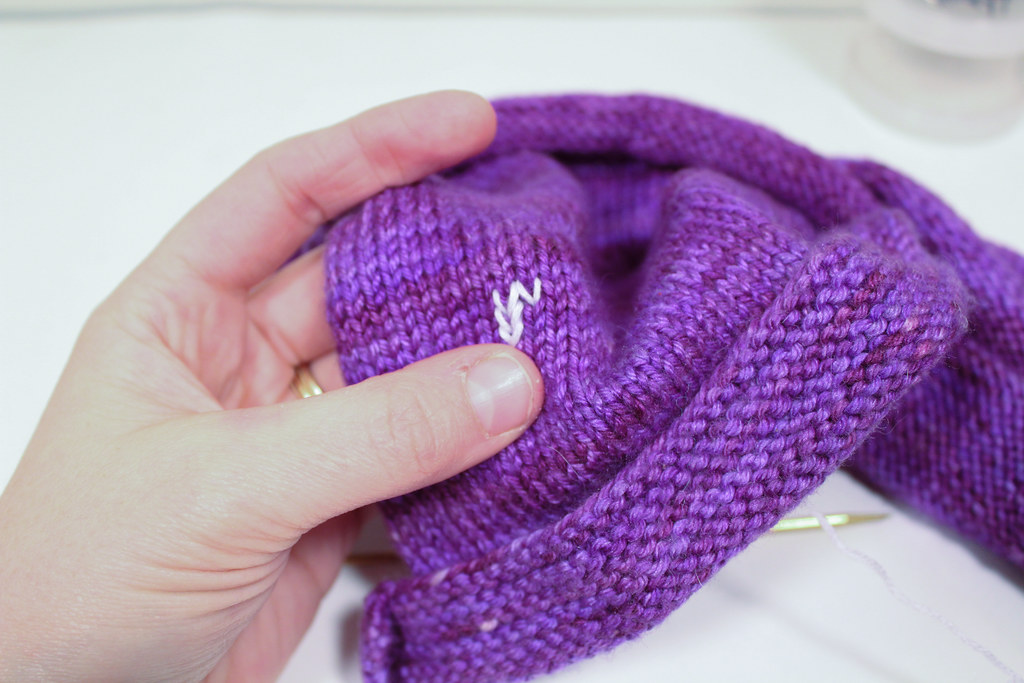
For the second stitch, repeat the same steps for the “V”
directly above the first.  Repeat as many
times as needed.
Now, you may have need at some point to move over to the
next column of stitches. Simply do the same steps for the “V” Directly next to,
or diagonal to, the one you last worked.
If you need to, you can skip a column or two of stitches to
get to the next place you want to embroider. 
Just remember to leave enough extra yarn so the knit fabric can
stretch.  I recommend that you try to
avoid skipping columns if possible.

When you are finished, weave in your ends.  The back of your knit won’t look quite as
nice as the front, but it still should be tidy.
Love these posts and don’t want to miss a single one?  Sign up for a weekly email digest of my blog posts!

Historic Stitching: Vintage Crochet Made New

This is a post that, in its original form, appeared for Jordana Paige’s blog.  The rights reverted back to me, and in light of the publication of Time Traveler

Photocredit: Sockupied
My Historically inspired socks

, I thought it was a timely blog post.  I’ve made updates and edits to this post, as time has reflected.

One of my favorite things to do when I get a little bit of time
(between teaching crochet and knit, designing, and writing) is to peruse
historical patterns.  It’s a fortunate
function of our digital age that the casual crocheters or knitter can, with a
click of their mouse, find a wealth of historical magazines online.
Now, I will not claim that reading historical patterns is
for everyone.  For one, half of my
digital collection is in French and German, and it can sometimes be a little
challenging to translate patterns.  And
even in English, patterns can trip the casual reader up, using the same name
for different stitches, or using terms that are no longer commonly used.
There exists a wealth of resources where you can find
historical patterns online.  To get you
started, I have listed some of my favorite resources:
http://archive.org/
(search knitting or crochet)
If you’re willing to do some digging in other languages, there’s a few other resources I can recommend:
http://gallica.bnf.fr/
(French, search tricoter and crochet)
http://www.collectionscanada.gc.ca
(Canadian, search knitting, crochet, or tricoter)
When you go to any of them, just search “crochet” or
“knitting” or “needlework.”  You’ll find
tons of patterns, though unlike modern resources, knitting, crochet and needlework
were not so sharply divided.  In the same
magazine you might find a pattern that calls for use of crochet, knitting and
sewing.  I think that’s half of the fun.
If you are willing to squint at some old etchings and
problem solve when things don’t quite go right, it can be a fun way to get a
glimpse of the past.  And maybe you’ll find some new patterns to love!
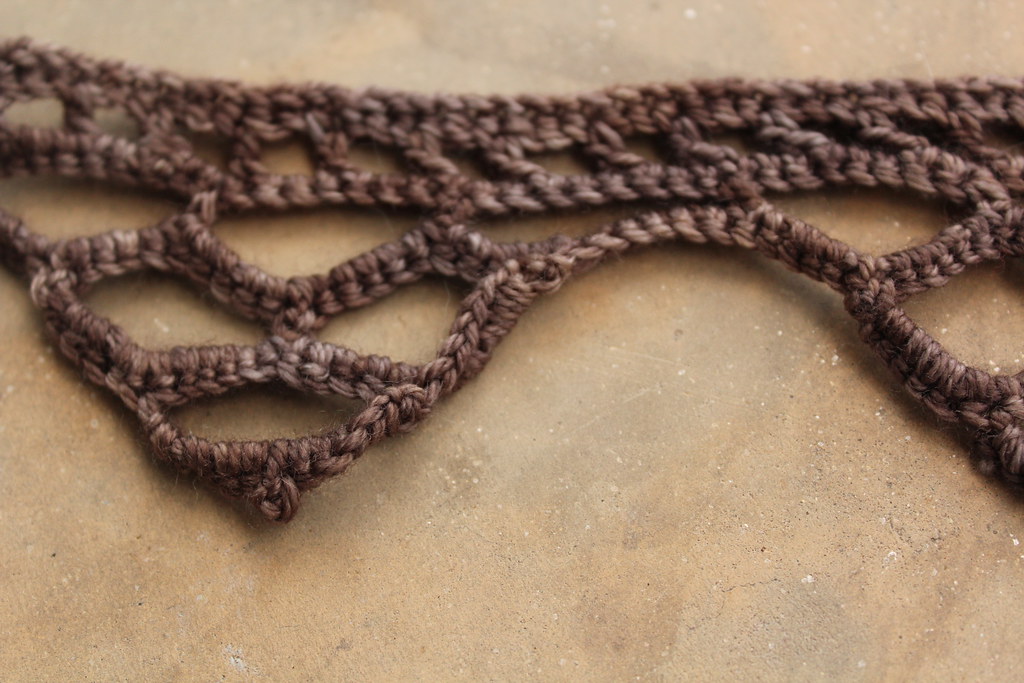
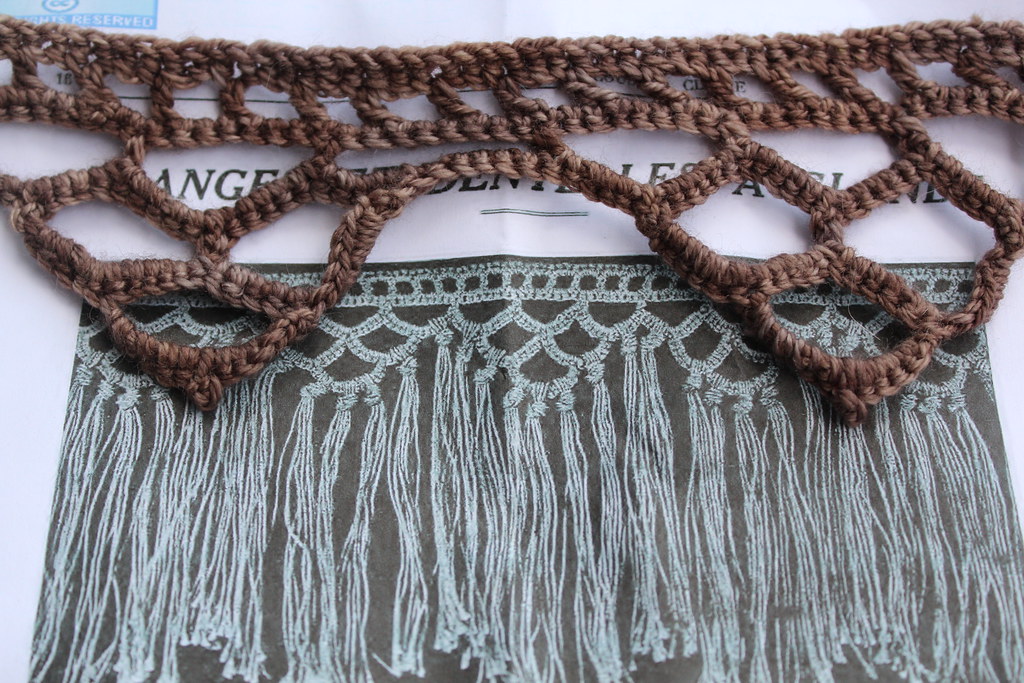
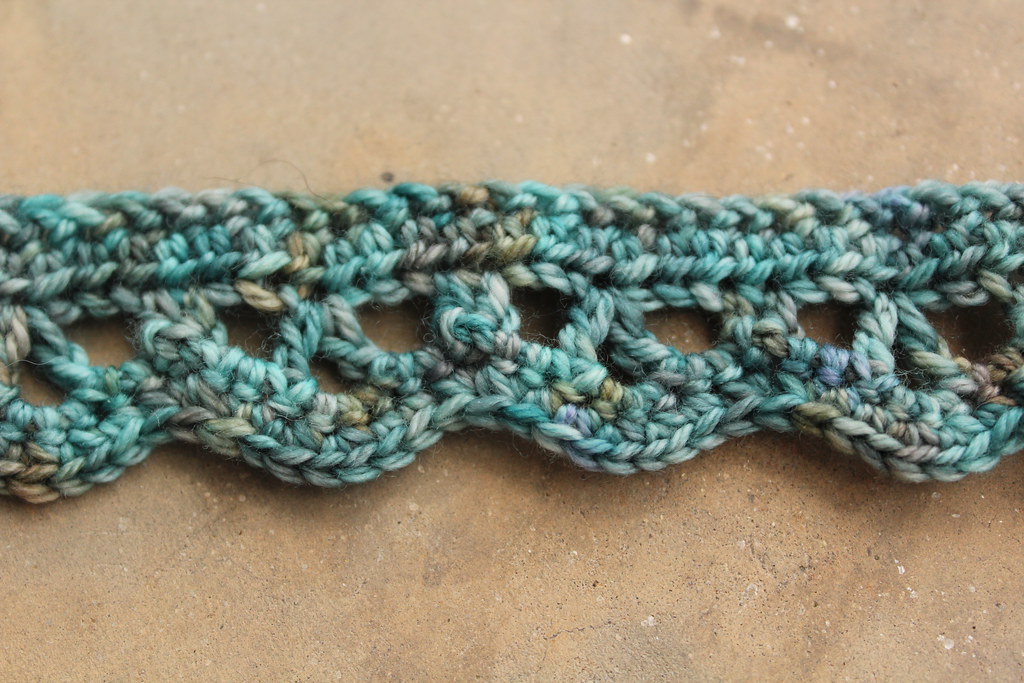
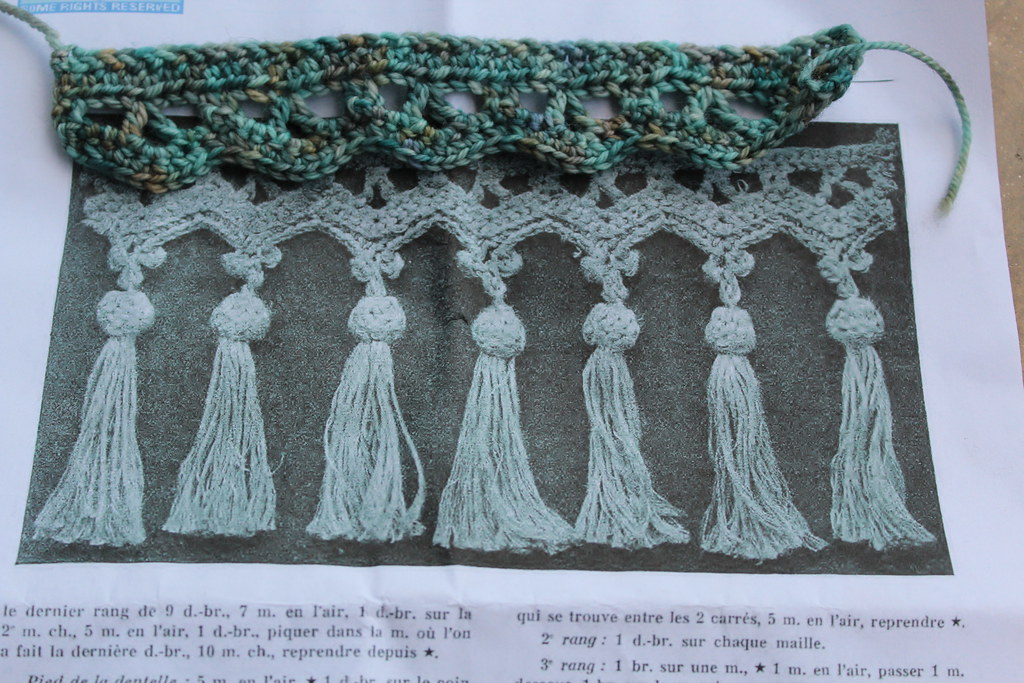
Below, I’ve written out two edgings that I adapted from “Le
Crochet, Album de Travaux de Cousine Claire.” 
These come from page 16-18 of the book, in the section titled “Franges
Et Dentelles a Glands.”  While the
original patterns served as an influence, I couldn’t help but add my own twist!
 

Tiers and Hills
Tiers and Hills
Ch 24 +1
Sample with original pattern.
Ch 2, sk 1st st, hdc all sts afterward. Turn
Ch 3 (counts as dc), *ch 2, sk 2, dc into next st. Repeat
from * until end. Turn
Ch1, sc into every st. Turn
Ch1, sc into 1st st. ch 8, sk next 7 sts, sc into next st.
Repeat until end. Turn
Ch 1, sc 11 times into ch 8 space. Repeat until all ch 8
spaces are worked. Break yarn and turn.
Sk 1st 5 sts, join yarn to 6th sc. *Ch 8, sk next 10 sts, sc
in 11th st, repeat from * once more. Turn, * sc 11 sts in ch 8 space, repeat
from * once more. Break yarn and turn.
Sk 1st 5 sts, join yarn to 6th sc. Ch 8, sk next 10 sts, sc
in 11th st. Turn, sc 11 sts in ch 8 space. Break yarn and turn.
Repeat steps 7 & 8 over next 3 ch bumps. Continue until
entire edging is worked.
 

Lacy Chevron
Lacy Chevron
Ch multiple of 7

Sample with original pattern.
Hdc in each st. Turn.
Ch 2 (counts as hdc) *hdc in 1st st, ch 2, sk next 2 sts, dc
in next st, ch 2, dc in same st, ch 2, sk next 2 sts, hdc in next st. Repeat
from * until end of row. Turn.
Ch 1, *sc in 1st hdc, sc twice in ch 2 sp, sc 4 in next ch 2
sp, sc 2 in next ch 2 sp, sc in hdc. Repeat from * until end of row. Turn.

Ch 1, *sc2tog in next 2 sts. Sc in next 2 sts. 2 sc in next
st, 2 sc in next st, sc in next 2 sts, sc2tog. Repeat from * until all sts are
worked.

Inspirations and Influences: Time Traveler

Photocredit: Sockupied

I’ve got a new pattern that released this last week, and you might have caught a glimpse of it as I hinted at it’s existence.  Time Traveler is a pattern based off of my love of historical knitting and crochet patterns, and I couldn’t be happier to have it released into the general public.  Let me tell you, for all the sock’s simplicity, it took me forever to figure out how to get the lace to wrap around the ankle without breaking the stitch pattern anywhere.  Absolute ages.  But it all works now: and I’ve done all the hard thinking for you!

Let me let you in on a little secret: every once and a while I like to pay homage to my favorite authors with my patterns.  One Salt Sea is a homage to Seanan McGuire’s book by the same name (which in turn is a homage to Shakespeare, but I digress).  Time Traveler is a tip of the hat to Diana Gabaldon, whose Outlander series features a time traveling heroine.  I have a few other patterns whose design sub names followed that name-scheme, but many of the names don’t make it to publication.  I have to admit, when I named Time Traveler nearly a year and a half ago, I didn’t know that the Outlander Series would be in the process of being made into a TV series.

Photocredit: Sockupied

There’s so much I love about how these socks turned out: the picot hem, which I love (and would like to use more!), the way the lace seamlessly travels into the rest of the sock (which, dear readers, you don’t know how hard that was!), and the deep plummy color of the yarn.  I love the way the heels are worked, the way the toe expansion forms – quite simply, I adore the socks so much.  The Hazel Knits yarn is a really good choice for this pattern: you need a sturdier sock yarn in order for the lace to block out and show well.  Something that is softer (but more fuzzy) doesn’t quite show how the increases and decreases interplay to make the lace what it is.

Later in the week I’ll be talking about historical patterns, and a little bit about the not-so-easy process of reading them and mining them for ideas.

Until then, enjoy!

Photocredit: Sockupied

Time Travler

Time Traveler released early last week, but I’m only now getting to talk and share it with you!  It’s a pattern based off of a historical knitting pattern (which is a secret love of mine).  But, I digress!  Let me give you the deets:

Time Traveler
by Jennifer Raymond

Published in: Sockupied, Fall 2014
Craft: Knitting
Category: Feet / Legs → Socks → Mid-calf
Published: July 2014
Suggested yarn: Hazel Knits Artisan Sock
Yarn weight: Fingering / 4 ply (14 wpi)
Gauge: 32 stitches and 46 rows = 4 inches in stockinette stitch
Needle size: US 0 – 2.0 mm
Yardage: 400 yards (366 m)
Sizes available: 7 (8½, 9½)” (18 [21.5, 24] cm) foot circumference and 8½ (9¾, 10¾)” (21.5 [25, 27.5] cm) long from back of heel to tip of toe; foot length is adjustable.

Jennifer updated a stitch pattern from a vintage book to create a new twist in simple lace socks. The zigzag effect is found in many vintage patterns, but also feels right at home in these everyday socks.

Buy Here: http://www.interweavestore.com/sockupied-fall-2014-emag-for-mac-and-pc

Packing: in which I try to balance clothes and yarn. Spoiler: Yarn Wins.

I’m getting ready to wrap things up before I leave tomorrow, again.  This time it isn’t for work – I’m going on a cruise, to the Mediterranean with my family.  Mr. Turtle, who has run out of vacation days, will not be coming along.  So if you get in touch with Tinking Turtle in the next 2-ish weeks or so, you’ll have to make do with him.

I, meanwhile, am in the middle of a very sort of contained chaos, a carefully crafted tornado of productivity.  I know this pace can’t be maintained for long (and I wouldn’t want it to be, frankly), but I wanted to get a few designs that are due the days after I get home off now, so I don’t have to worry about them on the cruise.  I also want room to bring home souvenirs, so the bag I’m working on for an issue of Annie’s that is due to be mailed off the day I get home is getting done before I leave, darnit.

As I mentioned before, my hands may very well fall off.

A separate matter, from the general packing, is how much yarn I need to bring and in what quantities.  Normally this is a source of much angst, but my options this time are rather naturally limited by the upcoming designs I need to work on: namely, a lot.  The yarn list reads as a sort of “yarn superstar” of the knitting world.

I have the Knitting Boutique’s new superwash yarn line in a couple of different weights, for two different designs due this fall.  I have a half-finished project in Dragonfly Fibers, for a collaboration I’ve also got due this fall.  I have two different sock weight yarns: one by Anzula (the blue and the gold) and the other by Hedgehog Fibers (the grey and the rust) – both yarns for Sockupied designs that are due the end of August-ish.  Also are some extra skeins, also from Anzula, for a design I’m working on in my (heh) spare time.  I also am considering one other quick project… which I know is just crazy because I already have more than enough to keep my occupied even if I was home and NOT on a cruise.

I think I might give The Yarn Harlot a run for her money when it comes to overpacking yarn.  And somehow, I still need to fit clothes.

I guess it’s the cost of being self employed: I’ll be bringing my work with me.  You can see how torn up about it I am.  *grins*

If you’ve got any burning questions for notes for before I leave, you’ve got until about 11 tomorrow (Saturday) to get them to me.  After that, I’ll be on a plane, and then a boat, happily taking a break before life becomes crazy again.

Got any advice for packing?  I’d love to know your strategies!

How old is Tinking Turtle?

Trying to figure out Tinking Turtle’s birthday is a little harder than knowing a child, pet’s, or even my own birthday.  Unlike a child, which has a day where they spring into the universe, (mostly) fully formed, my business’s birthday is not such a defined thing.  Is it the day I sold my first pattern?  When I got my first business cards?  The first class I taught?  I’ve been thinking about this , as this last weekend was Fibre Space’s birthday which they celebrated with a big bash.  Webs, the largest LYS in the nation, is celebrating it’s 40th year.  Woolwinders, another yarn store at which I teach, is celebrating it’s third reopening, as it’s been acquired by Amy, it’s new owner.   While all those places had physical openings, Tinking Turtle has never had a storefront.

According to Welcoming Spirit Home, there is a tradition among the Dagara of West Africa that a child’s birth isn’t celebrated when they are born into the world, nor even at conception, but at the moment when the child becomes an idea in the mother’s mind.

So I got thinking about Tinking Turtle’s birthday, and different moments that lead to what it is today.

My first teaching of knitting and crochet (in a formal class), was when I was 16; I taught knitting as part of a crafting afternoon activity to campers.  I wince a little at those early students (I could do much better by them now), but learned a lot about how students learn, what keeps people’s (and children’s!) attention, and the basics of how to break down a task into smaller bits.  I can still remember those hot summer days sitting on the camp green with our class supplies, talking, stitching, and passing the time as many handicrafters do, with friends.

My first pattern began the summer during my first job after college, when I discovered that my time was my own after work.  Vaguely stunned by the lack of schoolwork and with the security of a regular paycheck, I splurged on yarn that I wouldn’t have been able to afford as a student, and began my first sock design.  As the summer wore on, the socks steadily grew, and Mr. Turtle (then my boyfriend), began telling me that I could sell my patterns.  It would take nearly a year and a half later to sell my first design, and nearly two before I sold that particular sock design.  Still, I can remember those summer evenings sitting under the fan on the back porch, listening to crickets and passing cars, those socks growing stitch by stitch.

Summer was when I started the earlier iteration of Tinking Turtle under the name J’s Creations, and began navigating the process of creating a business out of nothing.  Summer was also when we incorporated Tinking Turtle as an LLC from its’ previous iteration as
a sole proprietorship – a step that signaled that the business I had started on a shoestring budget was doing quite well.

So perhaps Tinking Turtle’s birth-time can be determined: if not an exact day then a time, when the dreaming of this entity began to grow into the idea it is now.

Catching Up

We’re on the second, and final, week of the String Theory camp.  Two days ago was our messy day, again, and it’s interesting to see how the class ran last time vs. this time.  While the age range of the last camp and this camp are the same, the average age of the kids is wildly different.  It might also help this time I’m more comfortable in the space.

I also can’t believe it’s our last day!

One of the campers in the class yesterday proudly came in showing off her fingerless glove.  For a moment, I thought she’d snuck her project home to work on.  Apparently she had went to the craft store and bought a needle and yarn so she could practice
at home – and had been making more progress at home after she left for the camp.  She was so proud and excited to show me.  Take a look!

Most students are also done with their project bags… I’m a little bit nervous about filling the time on our last day.  Oh, well.  It’s great that they got so much done.

These next five weeks are going to be doozies.  I’m leaving in just over a week for a cruise with my family (a sort of last-hurrah before my younger siblings are all sucked into their respective graduate and undergraduate studies).  It will be a little bit of a working vacation for me – in addition to getting ready for Rhinebeck in October, I  have 4 (count them), 4! designs due by mid-September.  It’s a good problem to have, but I’m going to be working my hands off.  Luckily, two of them are knit, and the other two are crochet, so I’m hoping to save my hands.

Speaking of Rhinebeck – are you planning on going?  I’ve got a variety of classes I’m offering: everything from my very favorite Ooops class to much more advanced classes.  You should check them out!

A Number of Housekeeping Items

This next week (July 21-25), I’m going to be running the second session of my daycamp, String Theory, with Montgomery County College.  If you were thinking about signing up, it is already full, although there is a wait list.  There is a third week of the camp running from July 28th to August 1st.  If you are over the age of 16, this camp is not for you, sorry.  Kids only.

BUT!

This means that I have some mornings and evenings free.  If you have missed me terribly since I’ve moved, or you’ve been needing help with that tricky sweater, or you were looking for special instruction of one sort or the other, shoot me an email.  I’d be happy to set up a private lesson with you!

I’ve been using this break week to work on a number of things I haven’t been able to get to.  Oh, the amoun
t of design subs I’ve gotten off this week… I can’t even tell you.

Meanwhile I’ve been working on a few designs that I’m releasing on my own or in conjunction with a few other parties.  Bill Bryson’s A Short History of Nearly Everything has been my good friend.  I love listening to books on tape when I’m doing some marathon knitting/crochet, but I prefer non-fiction.  If you’ve got suggestions for any good non-fiction to listen to on audio, let me know.  I’ve nearly run out of Bryson’s backlist.  Other non-fiction pieces I’ve really enjoyed: The Disappearing Spoon and The History of Hand Knitting have been good.  I’ll give preference to science/history/textile stuff, since that’s where most of my interest is, but I’ll take nearly any recommendation.

Also, anyone have any good recomendations for workout videos?  All this traveling has make a consistent bike schedule really hard, and I gotta get in some other way to move.  I’d love some dance based stuff, and I’m looking for a good balance that includes a lot of stretching.  Yoga based things need not apply – yoga (even though I have many people who have been telling me how wonderful it is) and I don’t get along.  I think I really need to take some good beginner classes.

Michael and I borrowed a corded drill this week so week could hang our shelving units.  Boy, what a difference it makes!

This little shelf is perfect for putting detergent and other laundry supplies on.

Then, we got up a shelf in the dinning room:

The perfect place to put teacups and other pretty display items – where the cat’s can’t knock them over.
And also in the Laundry Room, some extra shelves:
Let me tell you, getting these up isn’t easy.

What a difference it makes to not only have the shelves and other things up off the floor, but to also get things off the floor by putting things in them.  We’ve nearly got all the different “public” places in the house under control.