MENU

Free Pattern: Water Babies!

You’re in for a real treat today: a free pattern!  As a policy, I rarely make free patterns, but Jordana Paige sweet-talked me into creating one last year.  Since it’s the heat of summer, I thought this would be the perfect repost, a sweet little something for kids and adults alike to enjoy.  Quick to make up, you can use these as intended and inflate a water balloon (either with water or air) to use as stuffing, or you can stuff and have as a forever-stuffed animal.
When I was younger and my mother needed something to keep my
siblings and I occupied, she’d make water babies.  Filling balloons with water, she’d hand us
markers and we’d go to town, decorating our water babies, taking boxes lined
with tissue to make beds, and making various outfits for them.  Inevitably, though we’d drop the balloon on
the grass, or it would brush up against the edge of paper or something else
sharp, and our beloved water babies would be gone – popped in a rush of water.
Being an enterprising young child, I decided that my water
babies needed an outfit, a protective cover to protect it from the world.  Being handy with a hook, I made small bags
that my balloon would rest in, to be protected. 
Over time these developed into quite elaborate creatures in their own
right.
And then, I grew up and forgot about them.
Recently, however, these water baby costumes were brought
back to mind.  I have two young girls in
my life, and they were playing with water babies the other week.  Inevitably, one got dropped on the hot
asphalt, and burst… leading to some quite natural tears.  I decided it was time for me to break out my
hook and an old idea, and give it a new twist.
And so, I present to you, a modern twist on my 20 year old
water baby pattern.
Free Pattern Water Baby
MATERIALS
Gauge: 7 sts and 6 rows equal 1”
Hook: F/5 3.75 mm
Yarn: Worsted weight yarn, 4 colors plus black and white.
C1: Dark Blue
C2: Green
C3: Red
C4: Light Blue
INSTRUCTIONS
Using C1, Create sloppy slip knot, sc 2.
Round 1: 6 sc in circle. (6 sts)
Round 2: *sc twice in next st. Repeat from * 6 times total.
(12 sts) Join to next st with sl st. BO.
Round 3: Switch to C2. *sc twice in same st, sc in next st,
repeat from * 6 times total.(18 sts)
Round 4: Switch to C3. *sc twice in same st, sc in next 2
sts, repeat from * 6 times total. (24 sts)
Round 5: *sc twice in next st, sc in next 3 sts, repeat from
* 6 times total. (30 sts)
Round 6: *sc twice in next st, sc in next 4 sts, repeat from
* 6 times total. (36 sts)
Round 7: Switch to C4. *sc twice in next st, sc in next 5
sts, repeat from * 6 times total. (42 sts)
Round 8: Switch to C1. *sc twice in next st, sc in next 6
sts, repeat from * 6 times total. (48 sts)
Round 9: *sc twice in next st, sc in next 7 sts, repeat from
* 6 times total. (54 sts)
Round 10: *sc twice in next st, sc in next 8 sts, repeat
from * 6 times total. (60 sts)
Round 11-12: *sc twice in next st, sc in next 14 sts, repeat
from * 4 times total. (60 sts)
Round 13-16: Switch to C2. Sc all around.
Round 17: *sc2tog, sc in next 8 sts, repeat from * 6 times
total. (54 sts)
Round 18: *sc2tog, sc in next 7 sts, repeat from * 6 times
total. (48 sts)
Round 19: *sc2tog, sc in next 6 sts, repeat from * 6 times
total. (42 sts)
Round 20: Switch to C3. *sc2tog, sc in next 5 sts, repeat
from * 6 times total. (36 sts)
Round 21: *sc2tog, sc in next 4 sts, repeat from * 6 times
total. (30 sts)
Round 22: Switch to C1. *sc2tog, sc in next 3 sts, repeat
from * 6 times total. (24 sts) At this point you should stuff your orange ball.
Round 23: *sc2tog, sc in next 2 sts, repeat from * 6 times
total. (18 sts)
Round 29: *sc2tog, sc in next st, repeat from * 6 times
total. BO. (12 sts)
Ears:
Using Green, foundation double crochet 12 sts. Bind off. Tie
a knot in one end, use the tail to attach the other end to the water baby.
Eyes:
Using White: Create sloppy slip knot, sc 2.
Round 1: 6 sc in circle. (6 sts)
Round 2: *sc twice in next st. Repeat from * 6 times total.
(12 sts) Join to next st with sl st. BO.
Round 3: Join C2, ch 1. *sc twice in same st, sc in next st,
repeat from * 6 times total. Join to Ch 1 with sl st. BO.(18 sts)
Using Black: Create a sloppy slip knit, sc 2.
Round 1: 6 sc in circle. BO. (6 sts)
Nose:
Using C2: Create sloppy slip knot, sc 2.
Round 1: 6 sc in circle. (6 sts)
Round 2-3: Sc all around.

Assembly: Sew eyes, nose and ears to water baby. Insert a
balloon into the back, fill with water or air. Tie balloon end in knot and
play!

Pragmatic Tips to Teach Crochet, Ages 3-6

Knitting is not the only craft that can be taught to young children.  I’ve taught young children to crochet , and I’d thought, in another part of the Tips to Teach series, I’d tell you a bit about it.  Some of these will be repeats, because I think it bears repeating, but some will be a bit different too.

Start with Double Crochet.  Double crochet has more of a rhythm, I think, than single crochet, so I think it’s easier to teach.  The way I talk about double crochet is, “Yarn over, go through the stitch, yarn over, pull through (3 loops on needle left), yarn over, pull through two (loops), yarn over, pull through two (loops).”  If you notice, between each step is a yarn over, so it’s easier for children to know which step is next.

Have them start working into a swatch you’ve done.  One of the most common problems I see when students start is that they make really tight stitches, and it’s hard to insert the hook into the stitches when you go to make the next row.  To forestall this, I make a small sample for my students to work into.  This way they can learn to identify stitches and also see how loose the stitches should be.  And if they are too tight at first?  I flip the swatch over and have them try again on the other side.

Show them both the pencil hold and the knife hold.  This is a big one.  I’ve found that teaching both handholds can often really turn the lightbulb on for a student.  Sometimes, one just feels better than the other, and sometimes the switch to something that feels more natural for the student can be all that you need to have them go from struggling to confident.

On the same vein, mention that there are two type of hooks.  A lot of people I’ve met who have been crocheting for a long time don’t realize that there are different styles of hooks.  While you don’t have to talk a long time about it, make sure your kid knows that there are two different ones, and let them try each.  A lot of people have a clear preference for one over the other.

Show kids what they are working toward.  A lot of kids can be really motivated by seeing what they are working toward.  Show them some of the patterns you can do with just a chain and a double crochet (like the v-stitch) so they know that they don’t have to just do one stitch in one stitch designs.  If the kid you are teaching grasps the concepts you are working on quickly, it can be worth teaching them things like the V-stitch (with counting and skipping spaces) before you teach them a new stitch like single crochet.

Also make note: A lot of the skills that are true for children knitting and similar skills for crochet.  While I talk about these more in this article, let me reiterate:
Make sure they’re interested.  
Keep it Short. 
Have them sit on your lap and hold the sticks with you.  
Show them several times, then have them “teach” you.  
Take turns.  
Focus on the skill, not on the result. 
Give them a small manageable project that finishes quickly. I have several listed HERE

The Relationship Between Chains and Stitches

So today’s post is going to talk about a concept I like to talk about with my students.  For some of you it’s going to seem pretty obvious, but for some of you (and me, for a long while) it was a concept that I struggled with.

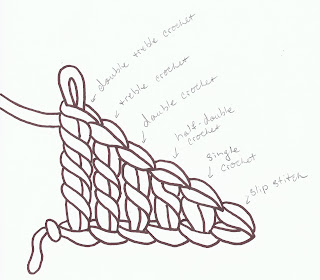
In crochet, it’s a convention that at the beginning of a row or round, where you need to get to the height of the next row, you chain a certain amount of stitches to replace the stitch.  The relationship goes something like this:

Sl st- 0 chains
Single Crochet – 1 chains
Half Double Crochet – 2 chains
Double Crochet – 3 chains
Treble Crochet – 4 chains
Double Treble Crochet – 5 chains
… and so on a soforth.
The key is, you can not only substitute chains for a stitch, but you can substitute stitches for chains.
Take this granny square.  It’s pretty standard, but you see where the single crochets are (hint: The red x’s)  They are worked into the 3rd chain.  I do this instead of doing a slip stitch to finish off the row.
Confused?
Let’s see if I can explain it with pictures.
Things making more sense now?  Let’s compare the two different types of Granny Squares.

Please. Don’t say you’re making a scarf.

Many people come into the yarn store where I work, and will say it’s their first time knitting or crocheting and they want to make a scarf.  I always try to steer them away from this.

Why?

Because a scarf takes a long time.  And especially if you are doing a garter stitch scarf or a scarf in single crochet, after the first 8-10″, you’ve got knitting/single crochet down.  Now you are going to be working that same stitch for at least another 50″.  Chances are you want to move beyond that one stitch.  Maybe learn to purl, double crochet, increase or decrease.  You start loosing interest.  And there, that scarf languishes.  You might even give up knitting or crochet altogether.

Please don’t do this to yourself.  It would be like a person who went into a weight loss program saying they needed to loose 100 lbs.  Well, you might want to loose 100 lbs, but chances are you are going to focus on more attainable, small term goals.  Perhaps just the first 5 lbs.

In a similar way, give yourself a more attainable goal.  Perhaps you’d like to make a pair of finger-less mitts.  Or a cowl.  Here’s a list of a few different projects you can do easily, as a beginner, and still get satisfaction from completing a project.

A shopping bag made out of squares.

A Pair of slippers. – they fold up really easily, and then you just whip stitch them up the sides.

Another pair of slippers.

A knitted bunny pattern – made of squares.

A garter stitch kitty made out of squares.

A teddy bear made of squares.

A small crochet clutch

Crochet slippers

Crochet Hat

Fingerless Mitts

Good luck learning, and may you set some accomplish-able goals!