MENU

Make Do and Mend: Recent Repair Projects

I’ve been working and plugging away at a number of repair projects, and while I’ve been posting them to Instagram, I thought I’d highlight a few here.  We’ve got one crochet piece and one knit piece.

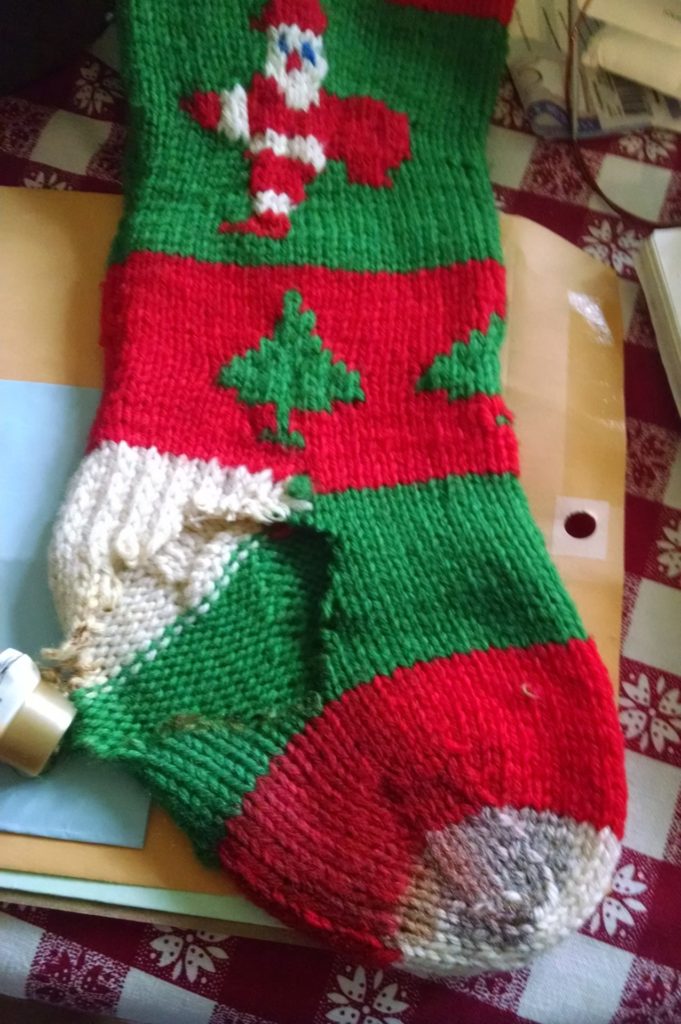
The knit piece features a stocking that was hung over the fireplace with care – but was hung a little too close to the flames!

a christmas stocking with a hole burned through it

a christmas stocking with a hole burned through it

Not only did the warmth of the fire burn through the stocking, but it melted one of the stocking stuffers to the fabric, causing the bottle to leak all over the fibers.  It was a mess!

A side note: this is a really good reason to use wool when making anything that will get anywhere near heat – wool does not melt or burn like acrylic or cotton.

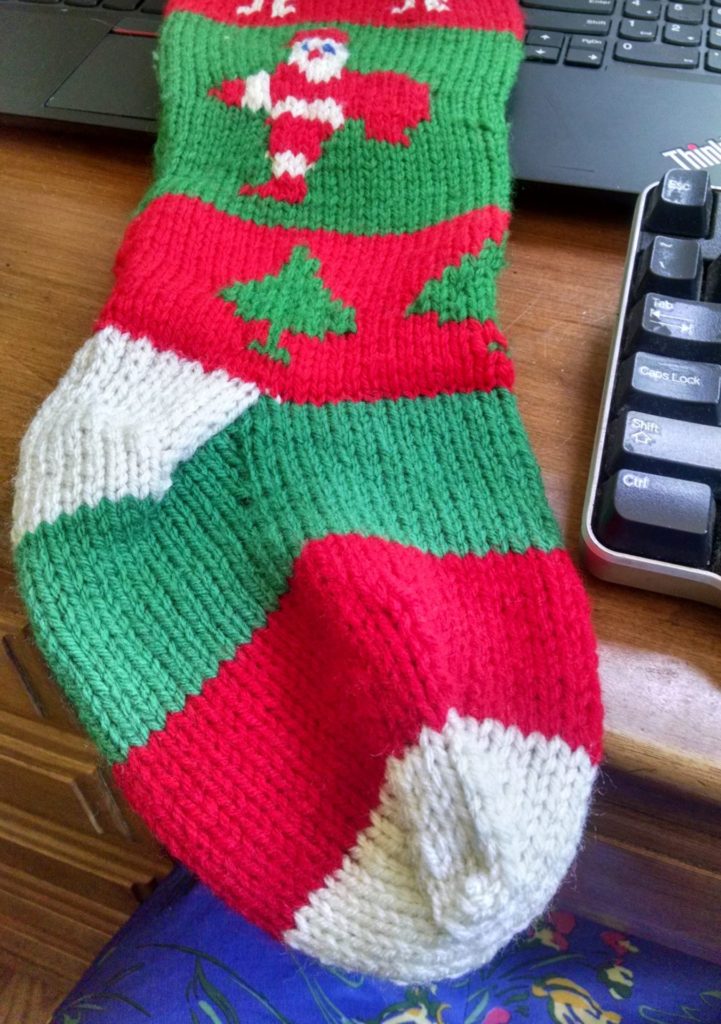
repaired christmas stocking ready to go back to its owners

repaired christmas stocking ready to go back to its owners

This stocking needed an overhaul – I pulled things out at the ankle and re-knit the foot.  I’m pretty pleases with the color matching – not perfect, but pretty close!


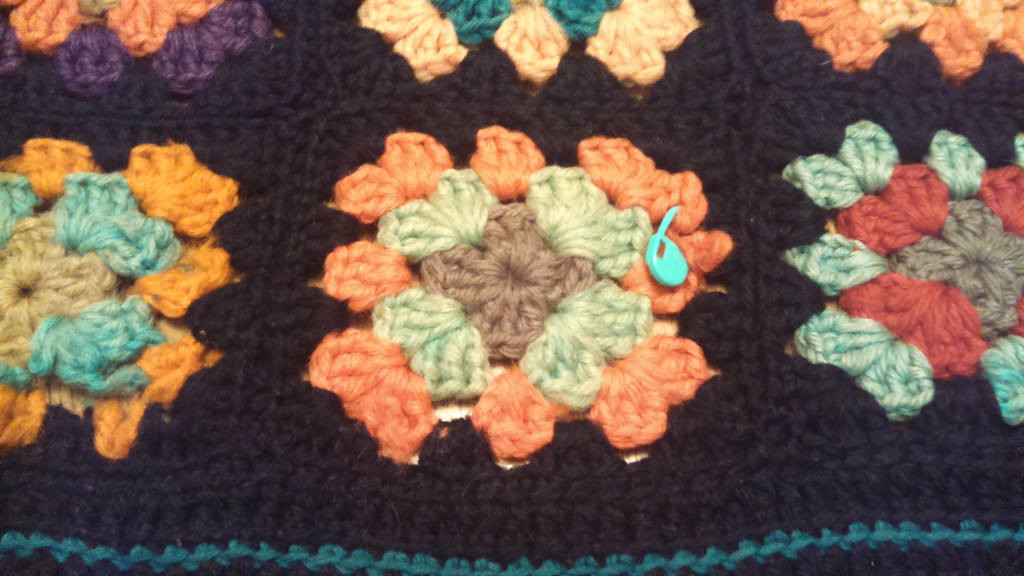
The other project I wrapped up was a crochet afghan that had developed a hole.  It was a nice diversion, since the last few repairs I’ve done of crochet afghans have been plain single crochet.

IMG_20170518_125831237

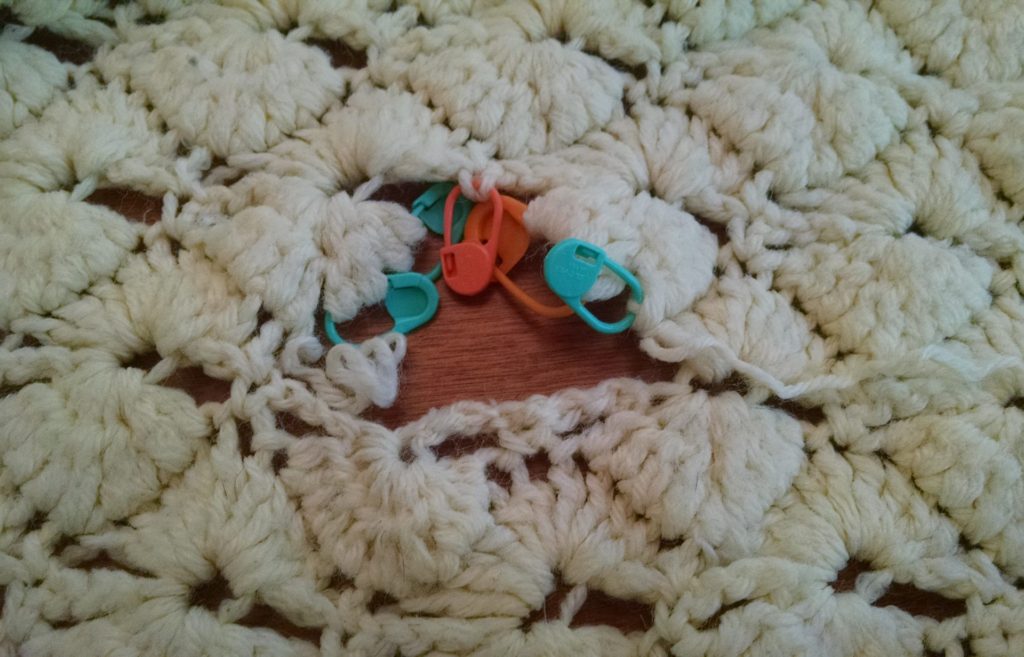
The first step was isolating the crochet stitches that were in danger of unraveling.  Because this pattern is a gathered stitch, things are a little more tricky – there isn’t a one-to-one ratio of stitches.

IMG_20170518_130232107

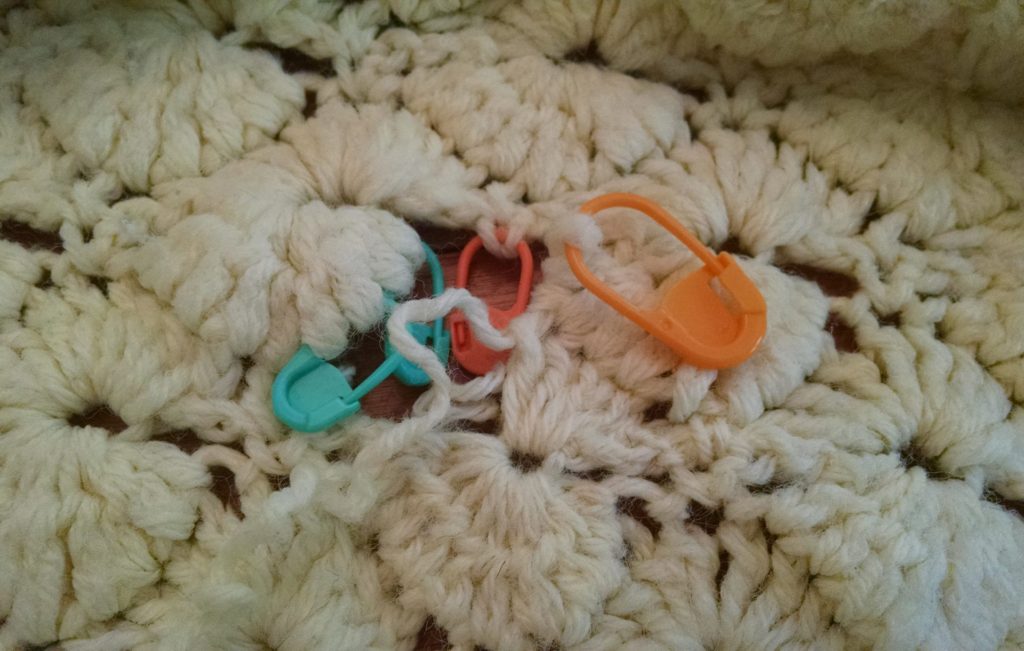
Then there’s the process of re-crocheting the area. I had a choice here: I didn’t have any of the blanket yarn I could harvest, so I could either use a closely matching yarn (which is tough to find with cream colored things), or I could crochet the piece in a slightly tighter gauge so I would have enough yarn to do the repairs (and weave in ends).

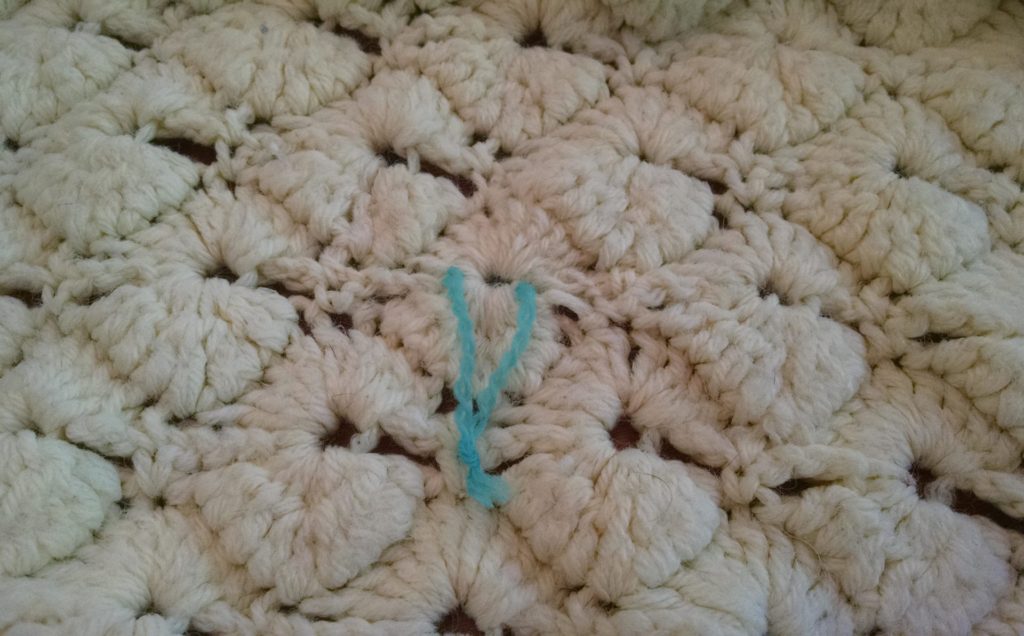
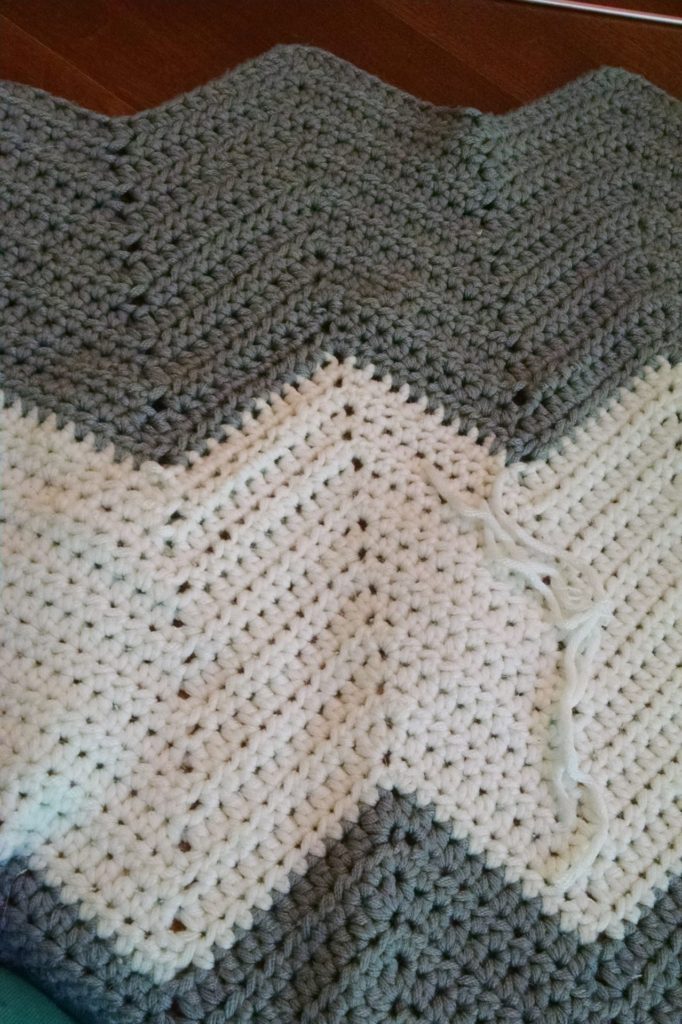
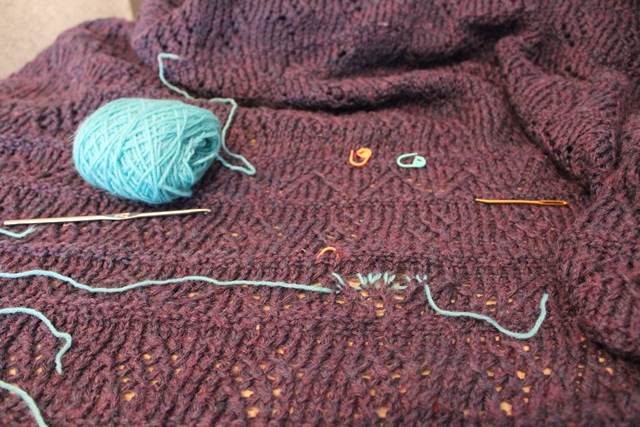
IMG_20170518_131004860

This is a strategy that works well over a small area – in this case, this one pinwheel (marked by the teal thread). Over larger areas this would cause the area to pucker.


And that is most of what I’ve been working on!  What projects have you gotten off the needles/hook?

Restoring Harmony to a Household with a Crochet Repair

I had a client get in touch with me a couple of weeks ago.  In my client’s words the situation was this:

I got your name from the local yarn store.  I have a blanket my wife made for my daughter.  My daughter’s dog put a hole in it (see photos) and now I need a repair to restore peace and civility to my family.  Is this something you could do (I hope)?

Clearly I had to help!

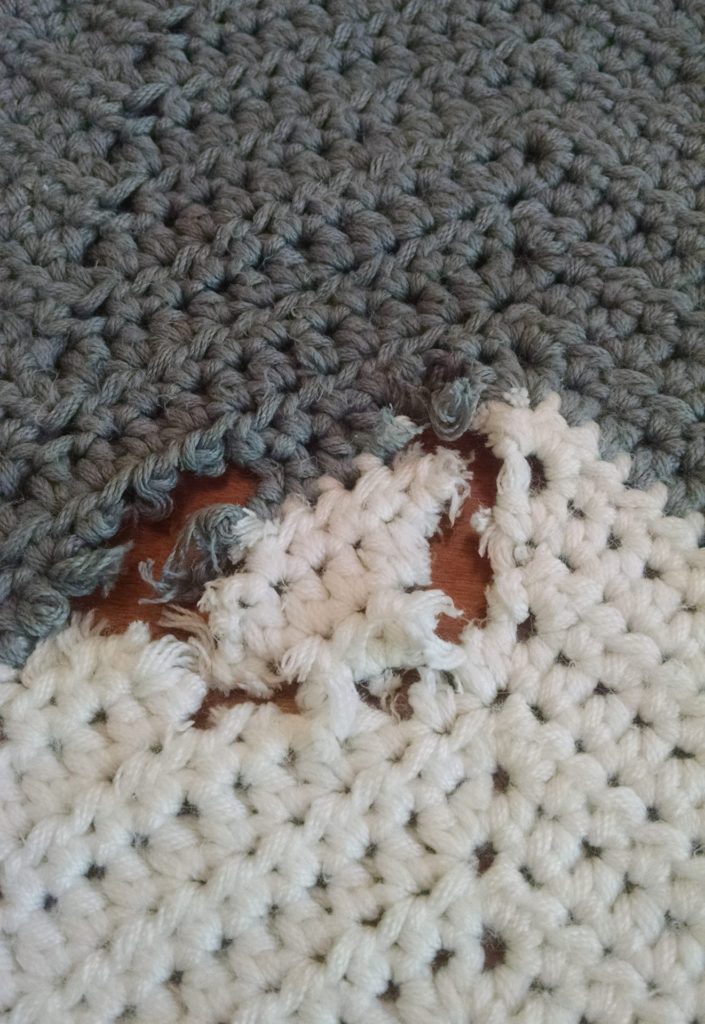
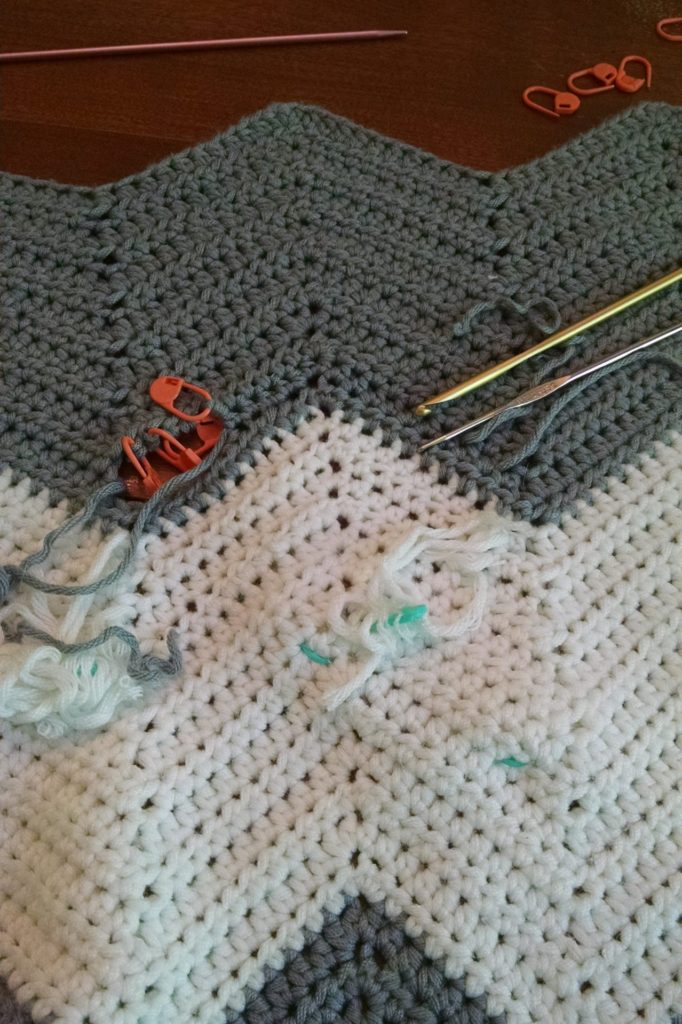
IMG_20170427_151351804

The hole was oriented across two of the different colors in the blanket, spanning 5-6 rows, depending on how you want to count it.  On a big plus, the person who crocheted the blanket had kept all the yarn that was leftover, giving me plenty to work with when making the repairs – a true luxury! I was able to dive into the repairs right away.

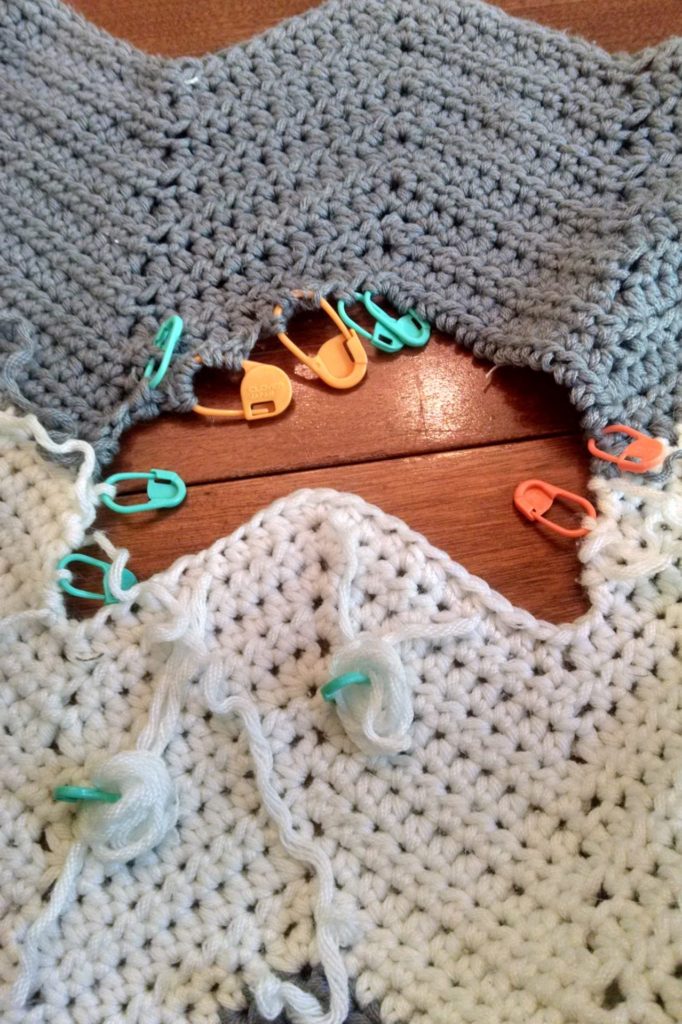
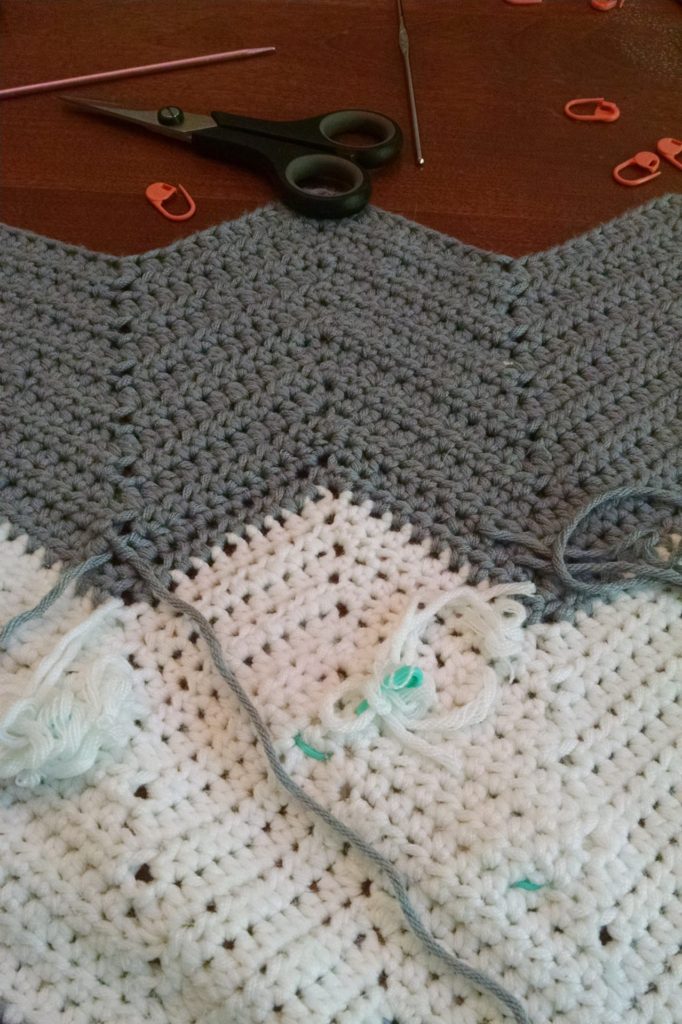
IMG_20170427_162743653_HDR

In most cases it’s better to make the hole bigger to make the repair, as long as you have a good amount of yarn to work with.  This way you aren’t working into damaged yarn, and you have enough of the ends to weave in.  Here, I’ve already worked the first row of the repair.  I like to pin my ends out of the way using locking stitch markers.  Because this was worked in rows and turned, I flip the entire blanket each time I repair a row, to work it in the direction of the repairs.  Re-crocheting each row isn’t the tricky part.  The tricky part is the last row when you have to connect the old rows with the new.  You’ll see I’m using stitch markers to hold the base of each of the half-double crochets that have been worked.


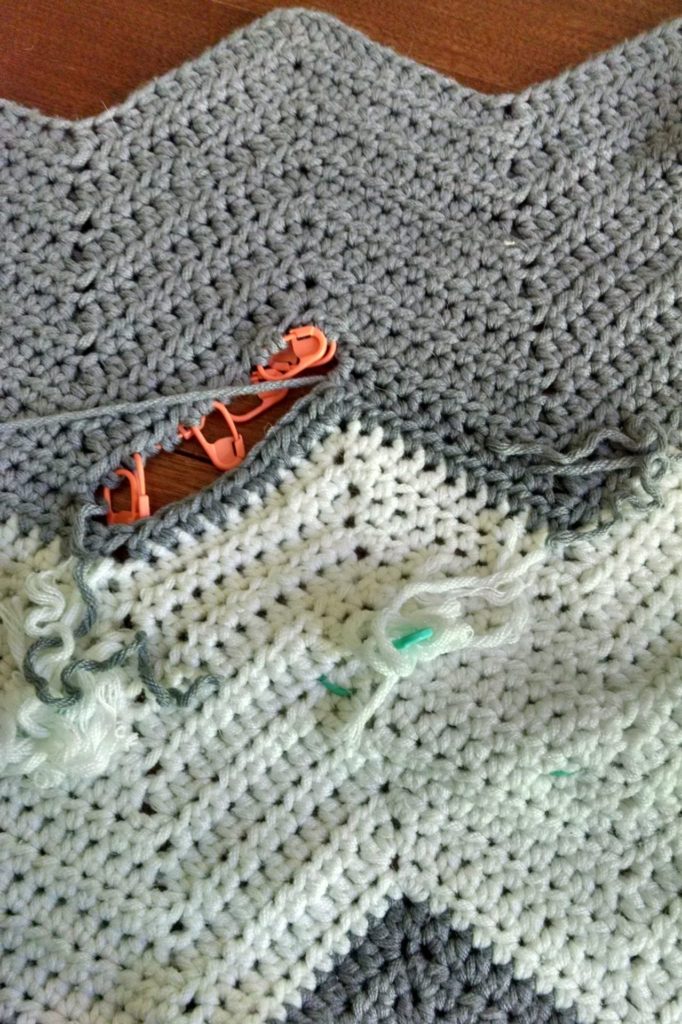
IMG_20170502_151107808_HDR

After working a couple of rows normally, it’s time to close up the hole and reconnect the old stitches to the new.  This takes some real patience, as each row you need to crochet a stitch, then take a needle and sew together the newly created stitch through the one above it.  I’m finding that the final row sometimes takes as much time as the entire rest of the repair, depending on how big the hole is!

IMG_20170502_151910461

Getting to the end with all the tools I use in play.  A smaller crochet hook for maneuvering things right where I want them, and the larger crochet hook so I can match gauge.

At this point Mr. Turtle wanders through and asks what I’m doing.  “I’m restoring peace and civility to a client’s home,” was my response.


IMG_20170502_152906802

Finally finished weaving things together!  I was so pleased with how the repairs came out!


IMG_20170502_155002822

Now it’s time to finish weaving in the ends and this piece can go back to its owner.


Reweaving a Lace Knit Blanket, Part 2

Today I resume notes on my recent repair, a lace hobbyhorse blanket.  This is the second of the series detailing my thoughts as I worked through this reweaving and repair project.  You can see the first part here.


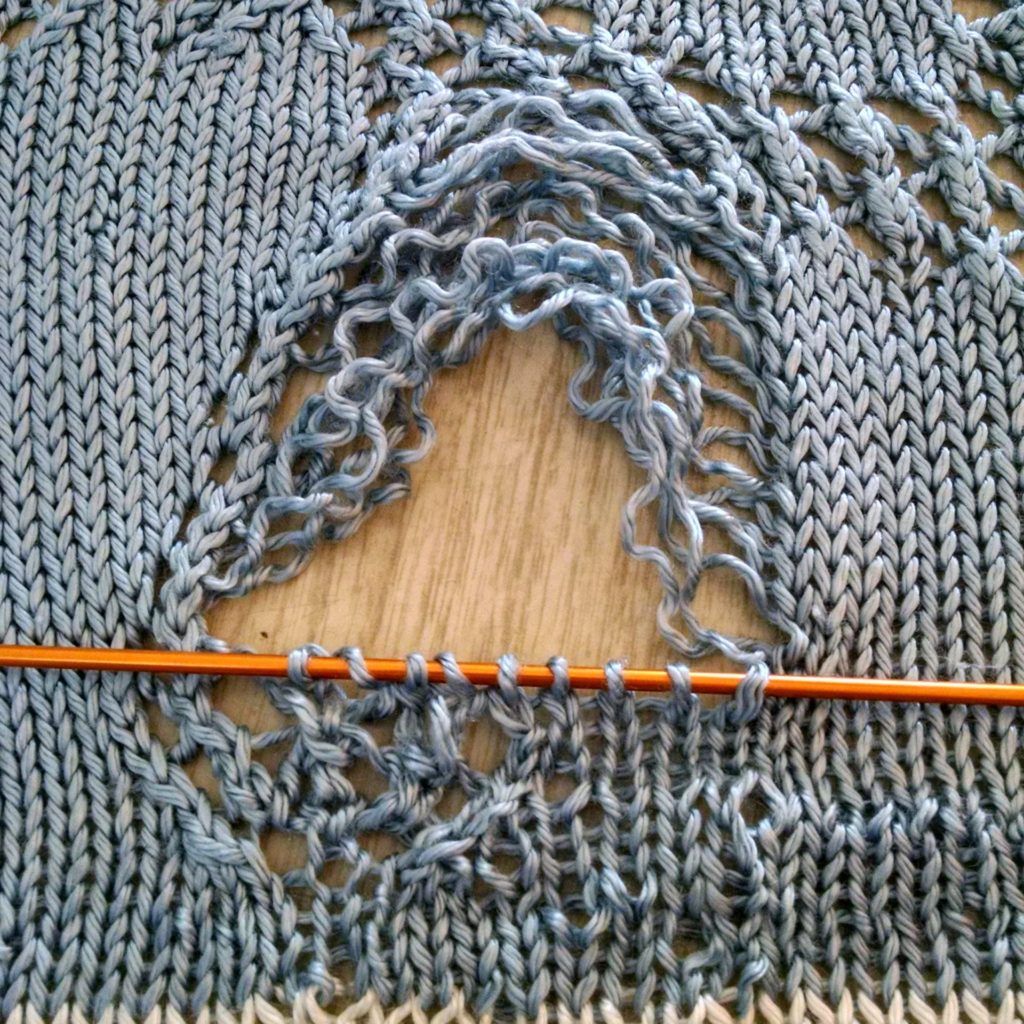
Base of the Hobby horse, stitches on locking stitch marker.

Base of the hobby horse, stitches on locking stitch marker.

When I last left off I’d gotten the piece reworked up to the lacework, and fixed a couple of runs that were below the hobbyhorse.  I’m ready to start working my way up the lace horse.

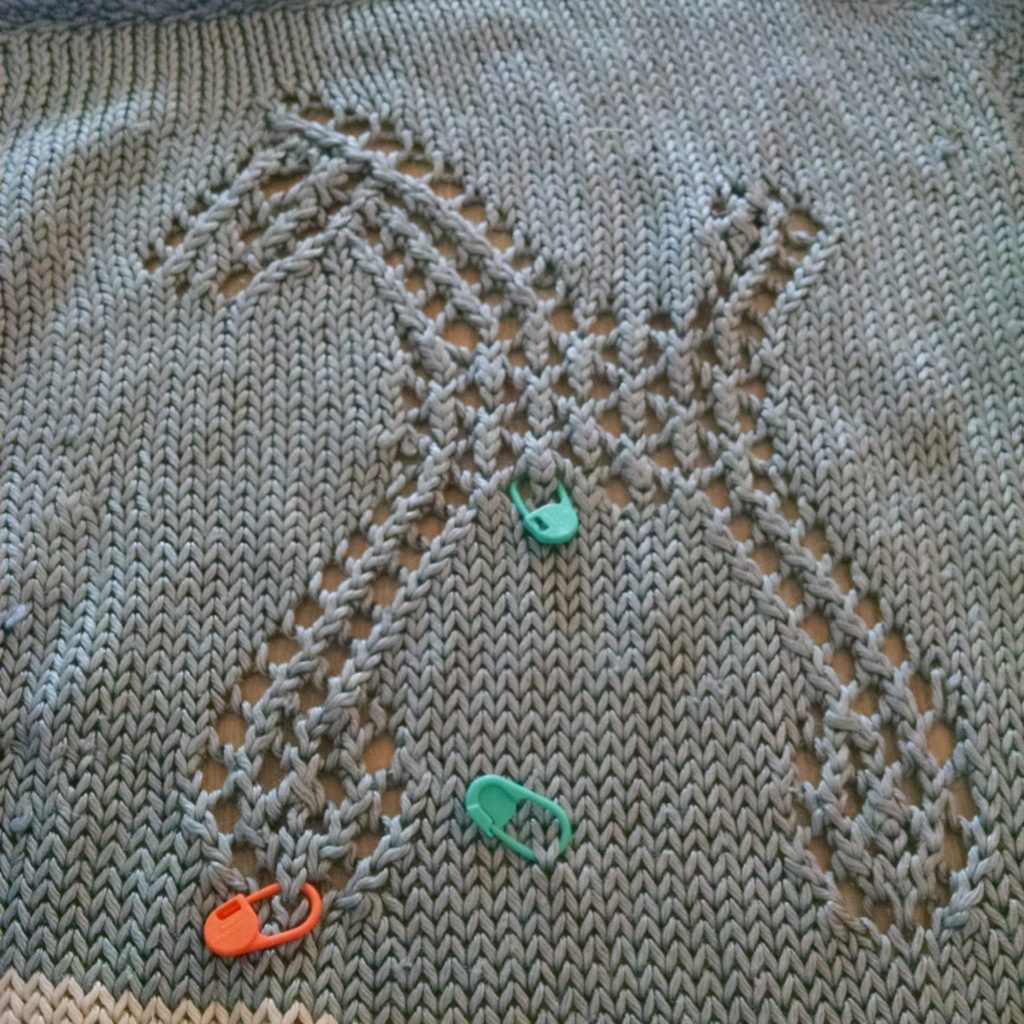
To review, this is what a whole hobbyhorse looks like (below). You’ll see I’m using stitch markers to visually mark my place – the green stitch marker represented the first line of stitches in a column that were whole and unraveled.

Reference hobbyhorse

Reference hobbyhorse

I got my stitches on a pair of needles and began “knitting” my way up the rows, following and mimicking the other lace horse.  I used a trick I often use with children and beginning knitters – the knitting needles are two different colors so I could easily remember which were right side rows and which were “wrong side” rows.  By that I mean the rows I was working with the lace (which would have been the right side of the pattern) and the rows I was just plain knitting (which would have been the wrong side, or the purl side).

Double pointed needles made it easy to not have to slip the stitches back and forth.

reknitting and reweaving the foot of the lace knit hobbyhorse

Reknitting and reweaving the foot of the lace knit hobbyhorse

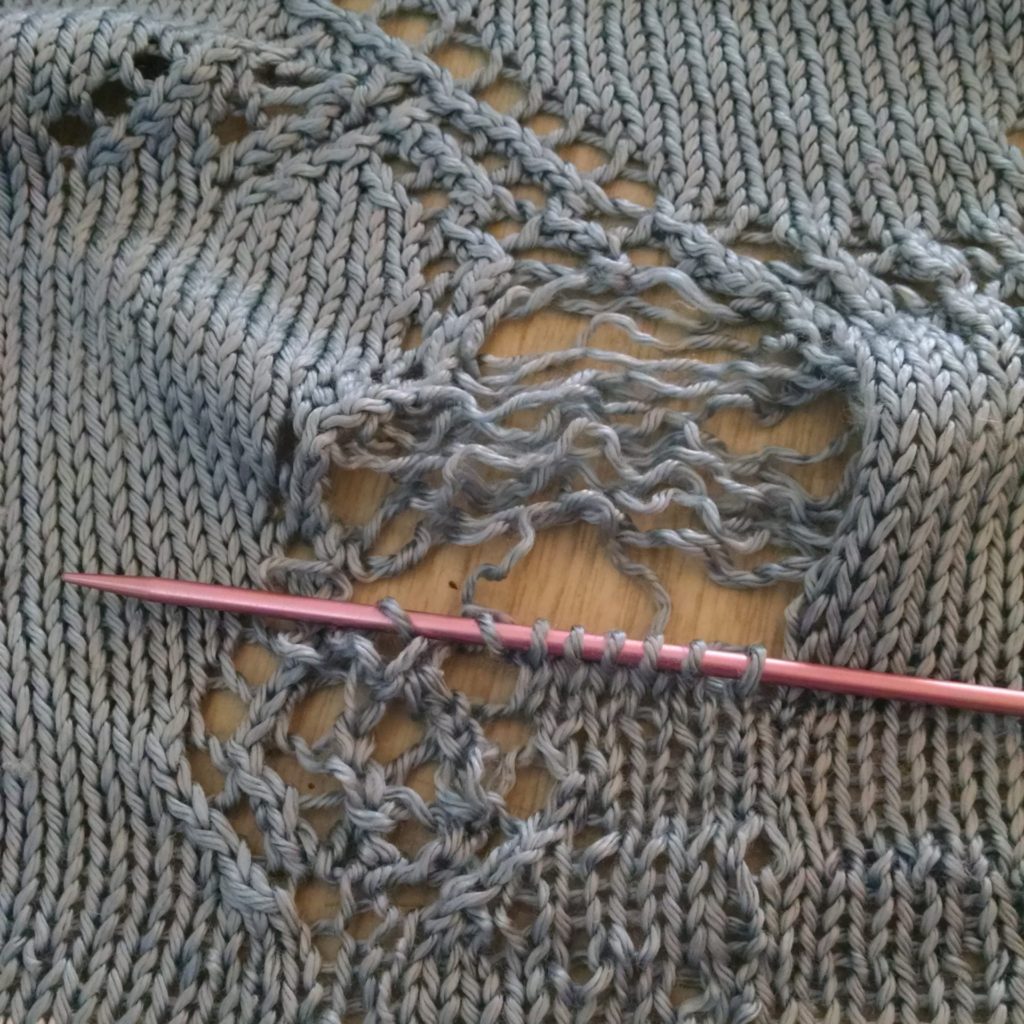
At this point I was to the top of the horse’s foot and  began to notice a problem I hadn’t been sure about until that point.  I thought there was a jog in the line of decreases and yarnovers to the left, but I wasn’t quite sure.  As I began working the pattern up the leg of the horse, it became apparent that a couple of mistakes had been made by the origional knitter when knitting the horse.

Note: you’ll also notice that as I was making these repairs I wasn’t paying attention to gauge too much – both because I could go back and “adjust” areas, and also because this repair had a time budget – it was more important to get the repair to a place where it wouldn’t come unraveled.

reknitting and reweaving the leg of the lace knit hobbyhorse

Reknitting and reweaving the leg of the lace knit hobbyhorse

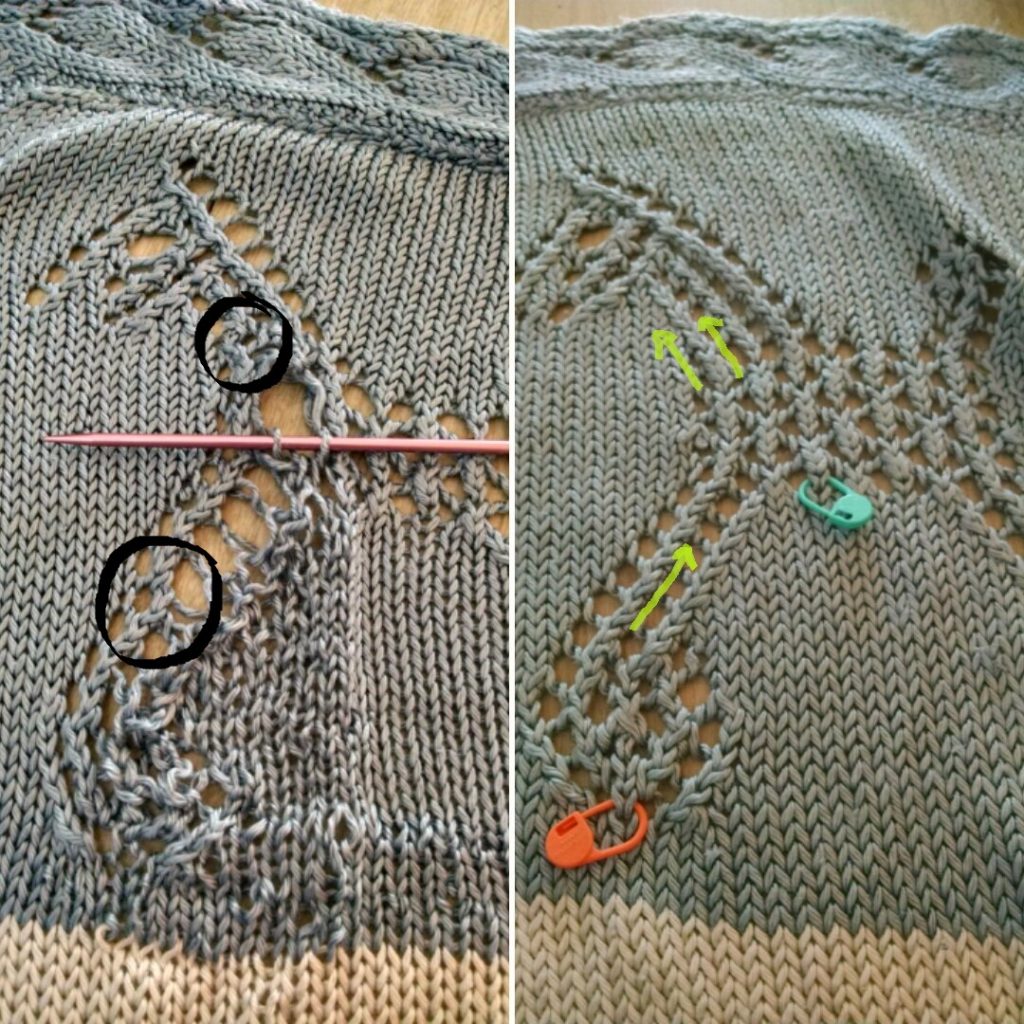
There were three apparent mistakes, but two of them affected the repair – circled below.  You can see the jog in the line of stitches on the bottom circle, and another jog at the line of stitches in the horse’s neck.  The third mistake, the one which may have led to the run in the first place, is right at the top of the dropped stitches.  The mysterious part of all of this was the fact that there wasn’t any broken yarn – the run must have resulted in a dropped stitch that couldn’t get fixed.

At this point I was also starting to suspect that there might have been an extra pair of stitches in the original pattern.  Looking at the horse I began to wonder if perhaps there was a fourth mistake that was lost when the stitches dropped down?  I’d been noticing that even accounting for differences in gauge, the stitches were really loose. This hypothetical fourth mistake would account for an extra row of stitches, and thus the extra yarn hanging out in each row.  I started to suspect that the drop might have resulted from the original knitter trying to fix those mistake; and perhaps losing a stitch in the process?

comparing how the hobbyhorse is supposed to look, vs the horse with the run in it

Comparing how the hobbyhorse is supposed to look, vs the horse with the run in it

By now I worked my way back to where the drop happened. I had to strategize how I was going to finish this repair off.  I had two different choices I could follow:

1.) Cut the yarn to reweave the affected area and then weave in those ends.

2.) Use additional yarn to sew the gap closed.

I discarded the first option for a couple of reasons: time and cost was a factor for this client. I also wouldn’t have much ends to work with when weaving things back together.  Since this is a child’s blanket, I wanted a sturdier option.

Instead, I went with option two.  I found some embroidery floss in as close of color as I could get, and cinched in the stitches.  I then sewed through the area several times, weaving in the ends afterward.

Getting ready to sew the run and hole in the hobbyhorse closed

Getting ready to sew the run and hole in the hobbyhorse closed

To get the stitches looking more even, and to test to make sure everything was locked in tight I decided to go with an unconventional approach for blocking. I wet the blanket, maneuvered the stitches so they looked as even as I could get them in a reasonable amount of time, and threw it in the dryer (since the yarn was dryer safe). This fluffed up the yarn, locked the stitches into place, and helped everything even out.


And there you have it!  This piece went off to its owner last week, back into the loving arms of a boy that will have it for years to come.

Repairing and Reknitting a Lace Knit Blanket

It’s been a while since I’ve done a post on a repair project.  So today I’ve got a post walking you through my thought process as I reknit an unraveled section of the blanket.  I thought this Hobbyhorse Blanket repair project was a good one to talk about my process and how I go about tackling a big repair.

This is going to be a very image-heavy post, so be forewarned.

IMG_20170213_145143730[1]

This is the blanket right out of the box it was mailed in.  The piece looks to be a cotton and rayon blend?  Not quite sure, and I’m not sure I want to do a burn test on it.  But it’s got a drapey quality, and it is able to be machine washed.  Looking at the piece I was immediately struck by the construction: lovely, lovely edging, and very unique and intricate lace hobbyhorse worked on each of the four corner panels (it’s a 3×3 panel blanket).

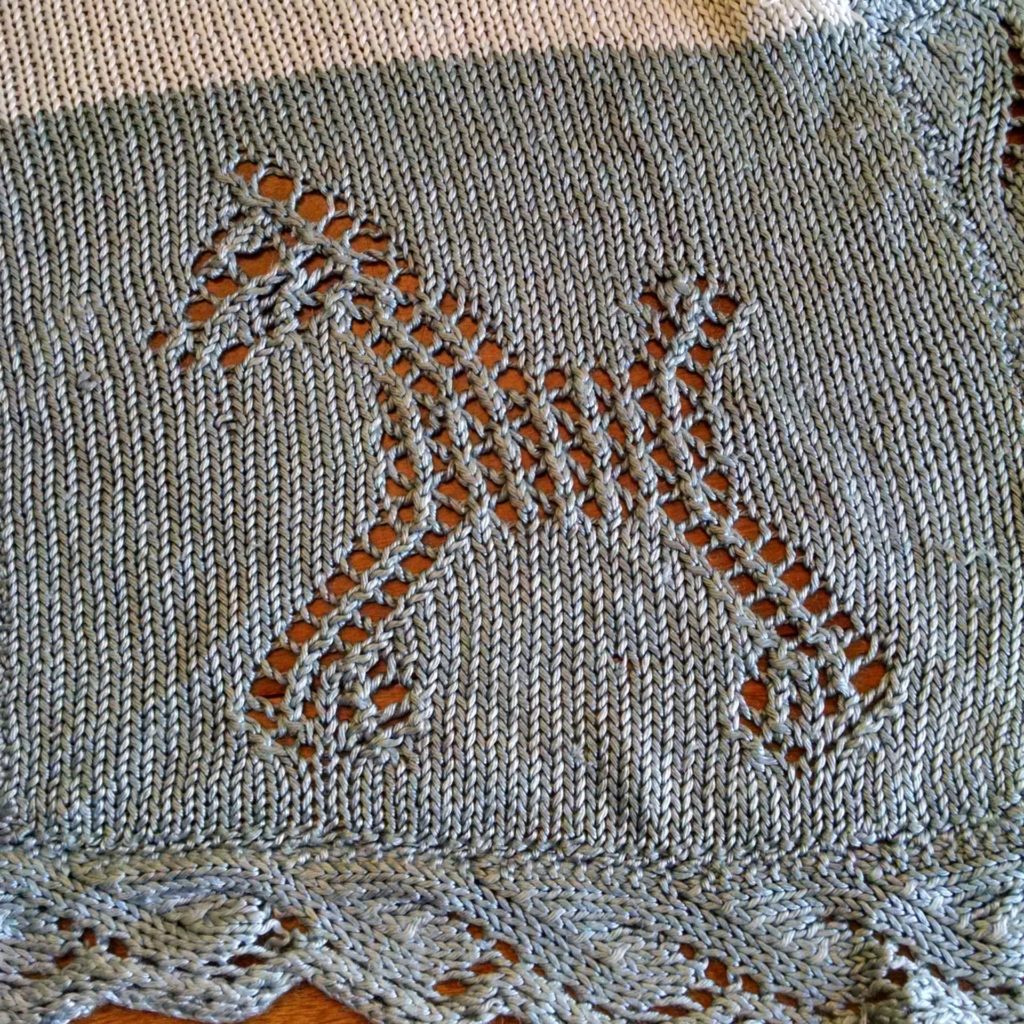
knit hobbyhorse

For reference, this is a hobbyhorse, looking how it’s supposed to look.  I’m actually assuming it’s supposed to be a hobbyhorse (based purely on the fact that it’s a crib blanket), I suppose it could also be a dog.  I think it’s a Barbra Walker lace pattern.  I’m actually not quite sure.  Now I’m going to have to go look it up. Anyone looking at this know the pattern? (I’ll update if I get a response)[Update: it IS a hobbyhorse, and WAS a Barbra Walker pattern. Ha!  I knew I’d seen it somewhere. It’s in Barbara’s Third Treasury of Knitting Designs pages 178 and 179].

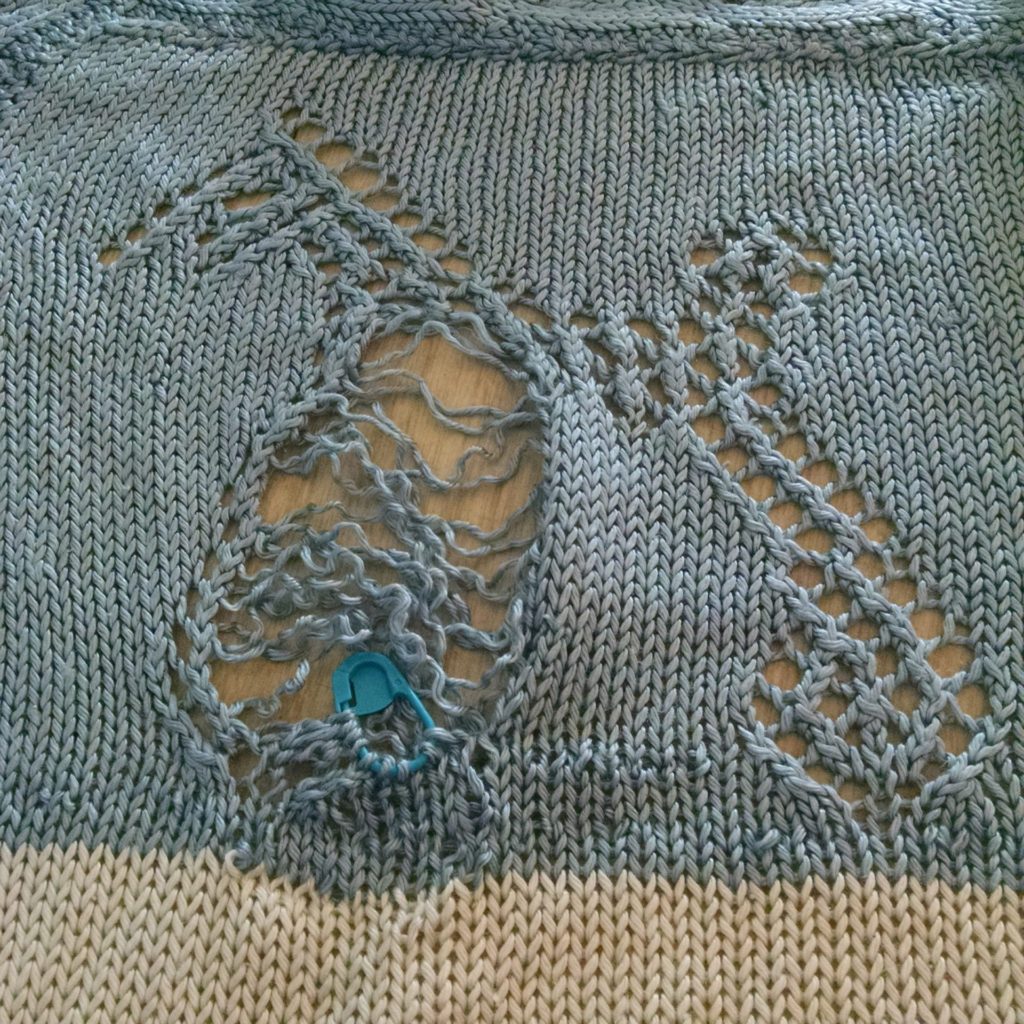
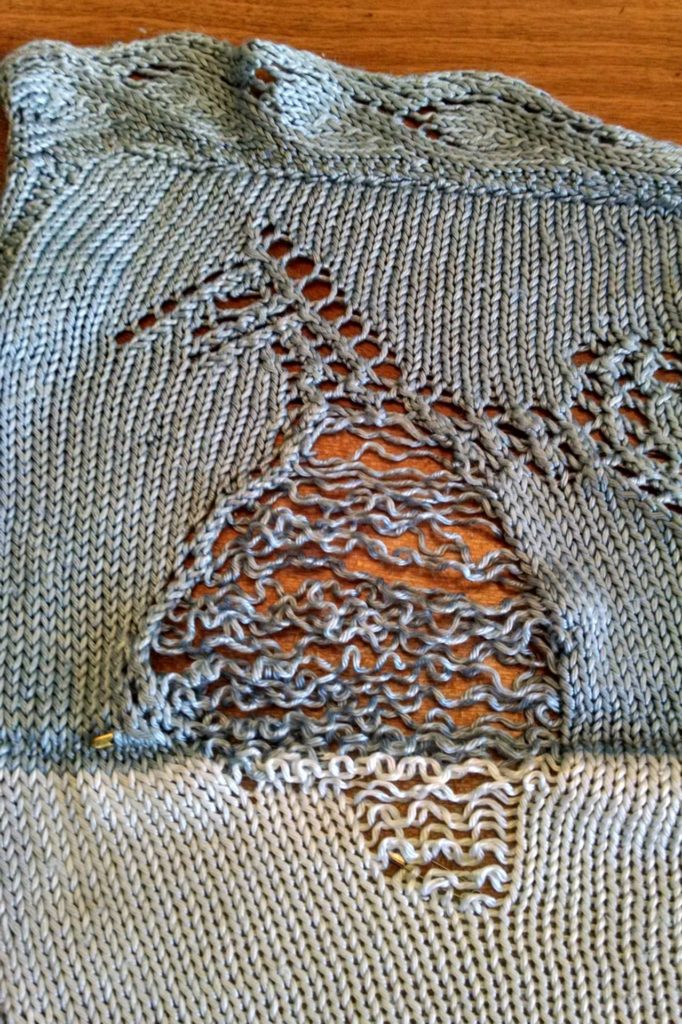
Hobbyhorse completely unraveled

This is the repair I need to make right.  We’ve got lots and lots of dropped stitches, and it looks like two different pulls – one right above the cream, and one about halfway up, on the righthand side thats a lot smaller.  Right away I’m a little disappointed about the pulls – fixing pulls is so fiddly!  And I didn’t notice these on the photos the client took.

IMG_20170213_145612480[1]

First step is finding all the dropped stitches, each one captured with its own stitch marker.  At first I thought it was eight dropped stitches, but after taking this picture I found a 9th one on the left-hand side, caught by the remaining safety pin.  looking at things, the first thing I want to do is fix everything until all the cream dropped stitches are done.  That’s just all easy stockinette, so I take my crochet hook and ladder all those suckers up.  In this case, i love that the blanket has been loved and washed so much, those kinks in the yarn make it really easy to space those stitches out.

IMG_20170213_150433116[1]

Okay, so we’ve gotten everything up to the cream, I want to tackle that massive pulled stitch.IMG_20170213_150454231[1]

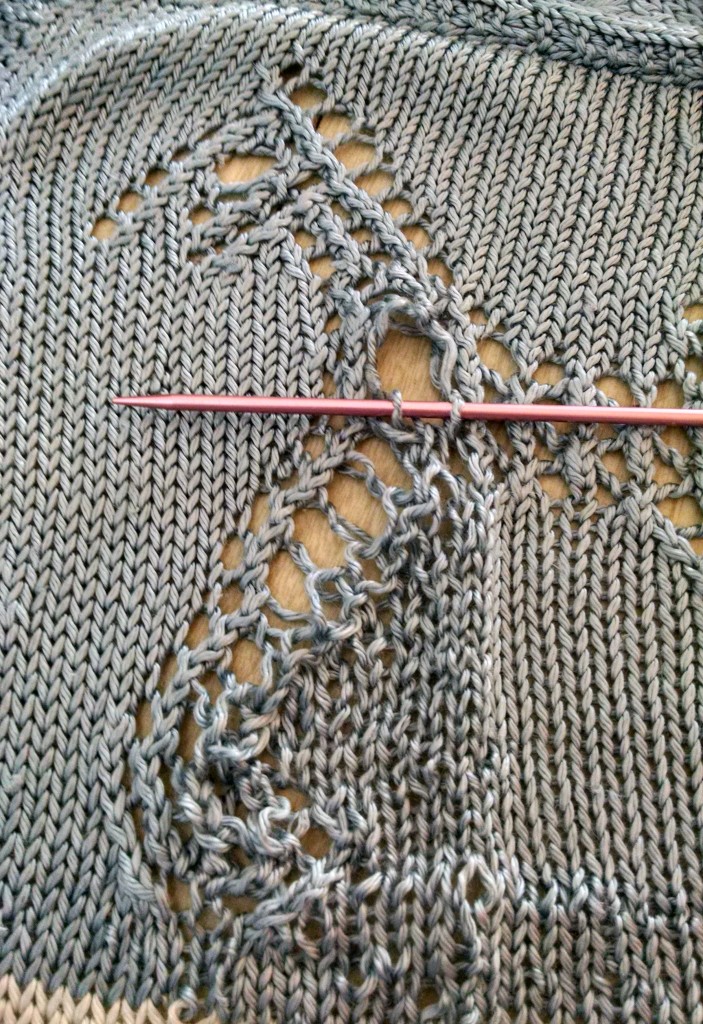
This pull is massive.  Nearly 20 stitches affected on the right.

IMG_20170213_150459010[1]

And another 10 stitches to the left.  Fun fun fun.  Well, lets sort through the strings here for the one that’s pulled to see what I’m working with.

IMG_20170213_150719612[1]

Well now, that’s a lot of yarn that isn’t where it is supposed to be.

IMG_20170213_152532582_HDR[1]

I decided to pull a bunch of the yarn through to where the end of the pull was, and work backwards, redistributing the yarn along. Again, the kinks in the yarn here are helping me, because when I place things right, the kink lines up and settles into the spot it once was in.

… Lots of time later…

IMG_20170213_153216265[1]

Okay, we’ve got the yarn redistributed on both sides.  It still looks a little wonky, but that’ll even out over time.  Let’s start tackling the lace pattern.  One of the good things here is I’ve got another hobbyhorse to compare to on the blanket, so I’m using that as a template.

IMG_20170213_155107783_HDR[1]

The first five rows were plain stockinette, so so I knitted those up quickly with my needles.  I’m not worrying so much about gauge right now – I’ll go back and fuss with things when I’m finished.

IMG_20170213_164514165[1]

This is where I’ve stopped – I have to figure out the lace section for the last bit, and I may have made a mistake.  Since I’d been at things for quite a while, I decided to give things a rest while I think through where I want to go next.

Keep tuned, and I’ll record the rest of the work on this project.

Progress Report: Tinking Turtle Post Baby

32195098356_fa3b4980bf_bI was once told by a friend that was proficient in email market that you should never acknowledge when you’ve been away from your blog for a while… merely you should continue as you mean to go on, and pick up blogging/tweeting/social networking as if you’d never been away.  But in this case, I think it’s worth a little note.

First a quick general life update: the Turtle household has been moving along at a fairly good clip.  We’ve managed to keep ourselves and our new child fed and alive, and got through the holidays with a minimum of drama.  But everything non-essential has been shunted to the side.

The state of things now looks like this: I’ve been wrapping up the last of my designs that I’ve had under contract, and contemplating how my business is going to pivot with Little Turtle’s needs growing and changing.  I knew, conceptually, that this business was going to change after a child, but the plan was rather vague.  We kept the plan vague on purpose.  I didn’t know what parts of the business I’d be able to work in and which parts I wouldn’t be able to.  Now, with nearly 8 months under our belts, I’ve come to some conclusions.

  1. I want to keep teaching. I love teaching students, and it is much more manageable to work teaching into post-baby life.  I can plan to have a weekend where I teach and Mr. Turtle takes Little Turtle.  I can plan to have every Wednesday night off so I can teach at local venues.  I can plan for fiber festivals and retreats and traveling to other locations.  I have a repertoire of classes, samples and worksheets, and can lean on all the work I’ve done the last couple of years to deliver classes that are great.
  2. I’ll keep up the repair and finishing. I like the challenge of working on different projects, and the repair and finishing provides a steady income, which helps.  I can also work on these projects around Little Turtle.
  3. I’ll be dialing back designing for magazines. I’m discovering that designing, for me, is really really difficult around Little Turtle.  Designing was always one of the things I did better when I had long stretches of times to work – to think out the math of a piece, to draw and sketch out proposals.  I need time to dream and think ahead, and that’s really really difficult to do these days.  My last two designs that I had due after Rebecca were born were really stressful, and I don’t think it’s the best return on investment right now.
  4. Instead, I’ll be working on some designs to support my teaching. I’ve found there are techniques I want to teach where I’ve had a hard time finding a design to teach off of that meets my needs.  Instead of making things work, I’m going to be working on self-publishing some pieces that will support the classes I want to teach.

… And meanwhile, Mr. Turtle will be making sure I blog more.

Parental Leave, Repair and Finishing

Sweater repair with guidelines.

Sweater repair with guidelines.

If you’ve been following the blog in the last few weeks, you’ll have noticed Michael is writing a series on Maternity and Parental leave.  You can read Parts 1 & 2, and there’ll be a third part coming out next week.  I’ve been enjoying reading about his perspective as Mr. Turtle.  While Michael and I came to deciding on Tinking Turtle’s policy together, our thought processes in some ways were very different.  I struggled with the day-to-day operations: how is this going to affect myself and the customers?  He thought more about the big picture: how are we going to match our leave policy to our values?  How have others handled parental leave in the industry?

One of the things we were both on the same page about was being transparent to our customers – I want to be clear about why we’re making the choices and decisions we are, with plenty of lead-time to accommodate changes.

As of yesterday, I made the decision to stop accepting submissions for Repair and Finishing until after Little Turtle arrives.  Over the weekend we took a hard look at my workload, due dates, obligations and commitments.  We came to the conclusion that I’m nearly at max capacity for designing, teaching and finishing/repair.

If I’ve accepted your piece and you’ve made arrangements to pick it up with me, you will not be affected.  If I have your piece already, you’ll be getting it back well before the baby comes.  But chances are, anything new that comes my way will have to be tabled until the end of June or the beginning of July.

If you are still interested in finishing or repair, you have a few options.  Right now, I have a signup list to be notified when I begin accepting repair work again (note: if you are on my mailing list, this list is completely separate).  If it is a true knitting or crochet emergency, drop me a note, as I have a very tiny bit of wiggle room for small and contained projects.  And for some types of finishing or repairs, I may have another resource to point you towards.

Got questions about what’s going on?  As always, ask away in the comments or drop me an email.  I always love hearing from customers!

Snowstorm Projects

It’s grey and overcast.  Every once and awhile I see a stray flake drift down from the sky, and there’s a hushed breath feeling to the air when I stepped outside this morning.  Like any good snow-day or snowstorm, I have on a ratty sweater with penguins on it, and my favorite pair of pajama pants.  Unlike my childhood snow-days, my list is full.  Self-employment (especially when you work from home), means you get to keep working until the power goes out – and sometimes you don’t stop then.

Still, I’m planning on knocking out all my internet things this morning, and curling up with a blanket and my projects this afternoon.  Just in the time I’ve been typing this, the snow’s started to come down harder, and is starting to show up on the walkways.

So what will I be working on as the snow comes down?

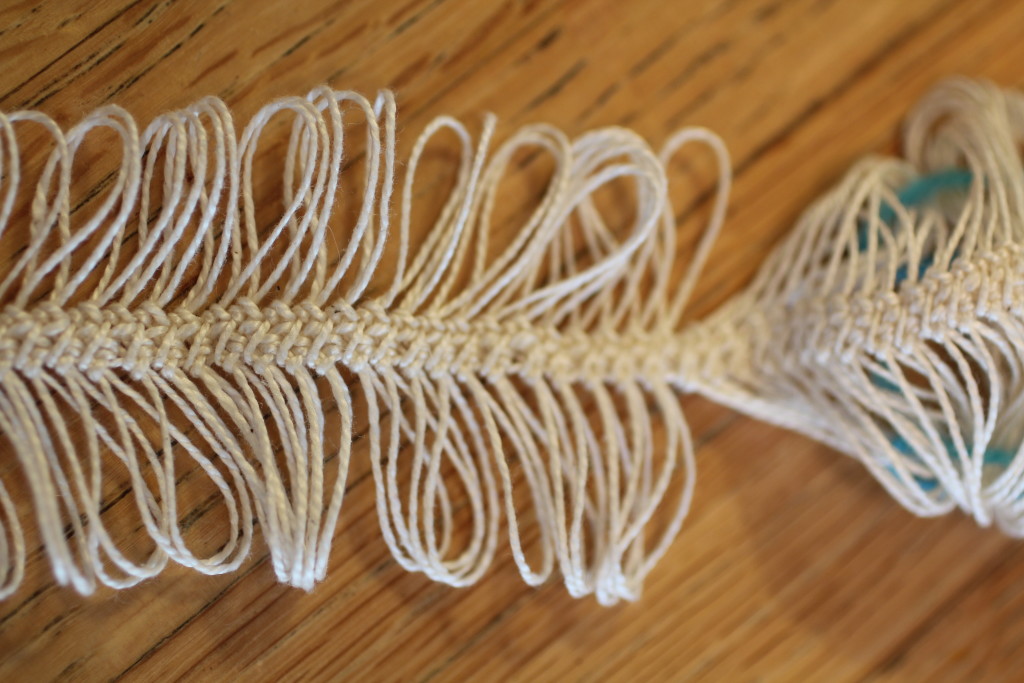
Hairpin lace against a table

hairpin lace, looking like some strange creature’s spine

I’ve got a hairpin lace project I’m working on for Piecework – I have to get it off by next week.  I’ve created a lovely swatch, and now need to get cracking on the real piece.  One of the things I love about Hairpin is how it comes together so quickly, once you get the strips done.  I’ll put on an audiobook, and get a good chunk of it done this weekend.

still working on the puppy-chewed blanket

still working on the puppy-chewed blanket

This blanket is turning into the project I can really only work on for two-hours at a time – before my brain needs a rest and my back needs to stop hunching over it.  This too has to be done by the end of next week.  I’ve got one more big hole to fix, one smaller hole, and a bunch of worn places to reinforce.  I’m really happy with how this is working out, and hoping to get a good picture of it when it’s done.  This is logistically a little difficult right now, as our downstairs guest bedroom has become a staging ground for a larger home project, and the upstairs really doesn’t have a good spot.  I’ll figure something out, though.

The final project I don’t have a picture of, but it’s my near full-to-the-top meding bag.  It’s one of the larger bags by erin.lane (seriously good project bags – she doesn’t do anything revolutionary, other than having really cute fabrics, a well-lined bag, and sturdy reinforcing at stress points… but really, isn’t that all you need?), and it’s filled with hand-knit socks that need darning or reinforcing.  I made a dent in them this week, and I’m hoping to make a bigger dent in them, as I’m down to two pairs of handknit socks, and that really isn’t enough.

And now, in the simple 40 minutes I’ve been working on this, the snow has really started to pick up.  We’ve got accumulation on most of the concrete surfaces, and Mr. Turtle’s chomping at the bit to walk into town, get our snowstorm wine and cheese, and take a romantic walk in the snow.  So, I must be off!

What’s your snowstorm project?

Repairing a Puppy-Destroyed Blanket

New Year brought a small, temporary break in the designing workload – thank goodness!  I took the time to catch-up on some of the repair work that’s big and cumbersome, including repairing a puppy-chewed blanket.

Over New Year’s I was able to work on repairing a family blanket that had been “savaged” by a puppy.  This is a tricksy repair, with lots of patterning.  I’ve been working my way through it, taking the time to trace out the pattern in waste yarn before making the final repairs.


Take a look at some of my progress:


20160101_7104

Here I’ve got the tools of my trade: good solid waste yarn that’s smooth and not prone to breaking.  I’ve got a bent-tip needle, locking stitch markers, a crochet hook, and the project.  You can see the hole closed up now, with the yarn ready to be traced over.


20160101_7107

And here we have the final repair, the new yarn nearly invisible.  You can find the fixed area by looking at where the orange marker is poking through.

20160101_7109


Another hole, this one near the edge.  The repairs are made a bit more difficult because every other row the knitter worked is twisted.  Twisted stitches are NO FUN to repair because the top unraveled bit looks like a backwards loop cast on.  Every other row has to be manually detangled instead of just dropping things back to a good starting point.

20160101_7112

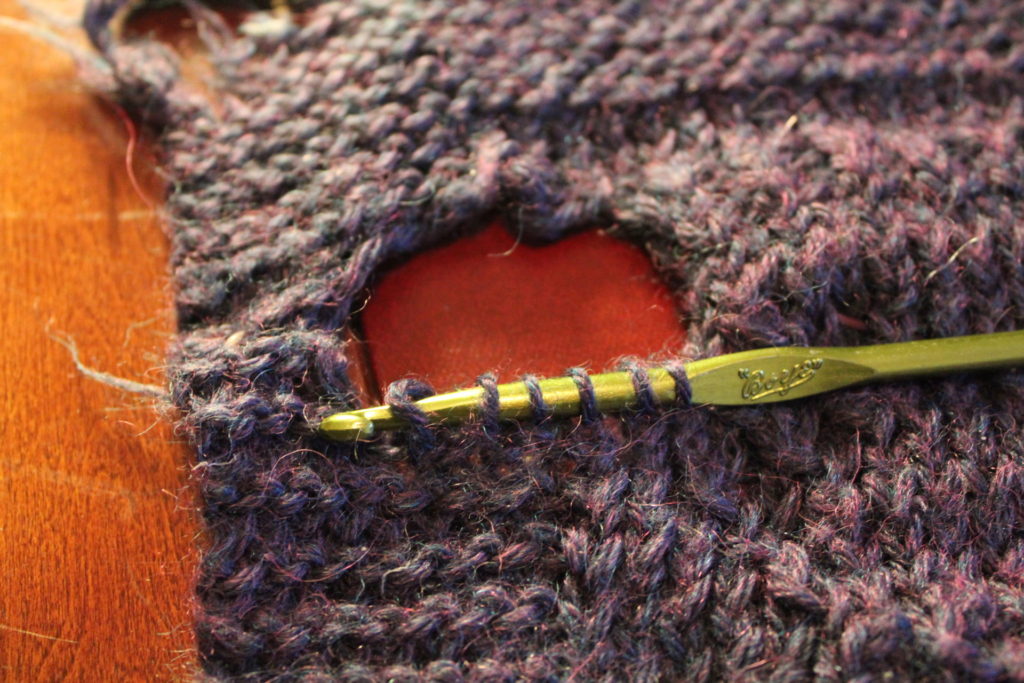
Here, working the pattern using a crochet hook.
20160101_7114

And now, the hole ready to be traced over with the new yarn!  Halfway finished!

Stay tuned, as this blanket has several more tricky holes that I’ll be tackling.

A Perfect Sweater Repair

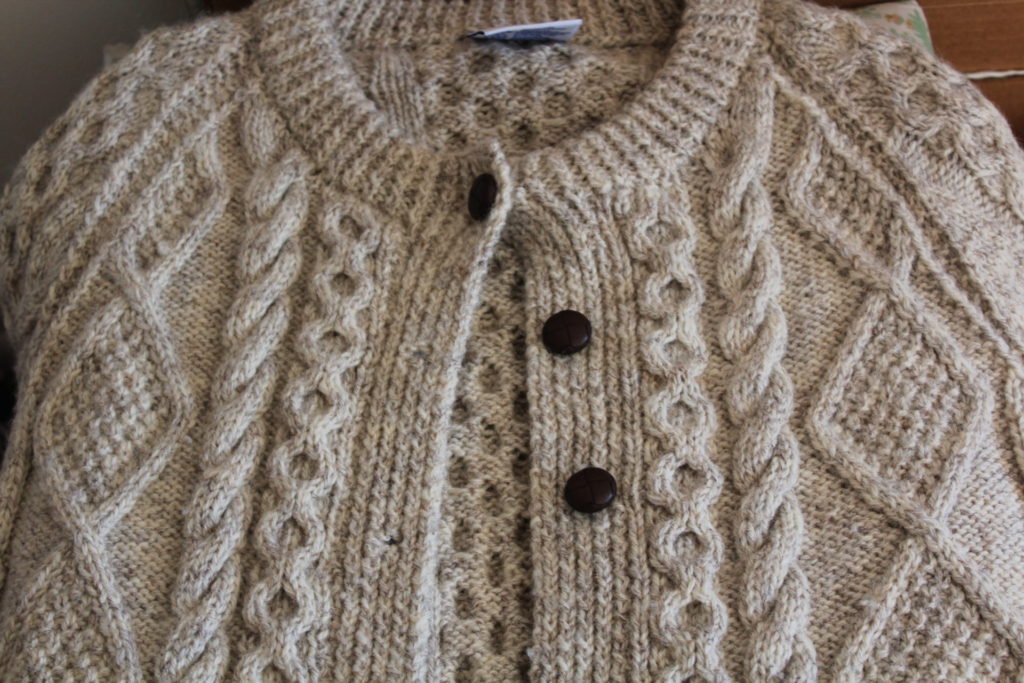
As I mentioned earlier this week, I’ve been hopping, trying to wrap up finishing projects before Christmas is truly upon us.  I’ve nearly pushed through the projects that are due in the next two weeks (and then the rest aren’t due until the New Year!).  I had one repair in particular that I wanted to share – a sweater repair in the Irish Knit Style.  The owner, AM, discovered me through the Washington Post article, and got in contact with me shortly thereafter.  She had a hole right in the front of the sweater, and could I please repair it?

As always, I told her I’d do the best I was able, but I was concerned – the yarn she had, a cream flecked with bits of brown, looked to be tricky to match.

This week I sat down to start on her repair, and when I pulled her sweater out of my bag, I couldn’t help wincing – this yarn was going to be really tricky to match.  I have a number of different creams on hand, but all of them were too light, and with too much “yellow” undertone.  AM’s sweater was a cream with an almost grey undertone.  And again, it had flecks of brown it it – tricky to match.  I checked the sweater – there wasn’t a good place to “harvest” yarn without going to a lot of effort, and I knew AM wanted to keep the costs down.  So matching the yarn from somewhere else would be a better option.

The hole itself was a lucky one: a row higher and it would be in the middle of a cable – a repair that’s much more finicky and tedious to do.  Two rows down there was the same problem.  This hole happened in exactly the right place – the few rows between two cables.

Well, it’d been a while since I’d been to one of the local yarn stores.  I figured it was time for a visit.

The Knitting B is a local yarn store about 25 minutes from where I live.  It’s the longest drive to a LYS I’ve had since I left my parents’ house.  So I don’t get there as often as I feel I should, and it’s too bad.  It’s a great store with lots of natural light, a solid selection of yarns, and a good parking area (always a plus!). Elizabeth, the owner, had an LYS in Charlottesville, VA for 25 years.  She’s a savvy businesswoman who knows here stuff.

When I got to the Knitting B one of the employees began helping me out trying to get a match.  Everything we pulled was not right.  Many of my go-to’s weren’t working.  And then, I remembered a trick I’d used before to get a good match.  Color changing yarns often will have sections that shift between colors, which means you get a lot of “bang” for your buck – and in this case, a couple of yards of yarn that match a hard to match yarn.  In this case, Noro Silk Garden came to the rescue.

The repair was pretty standard after that.

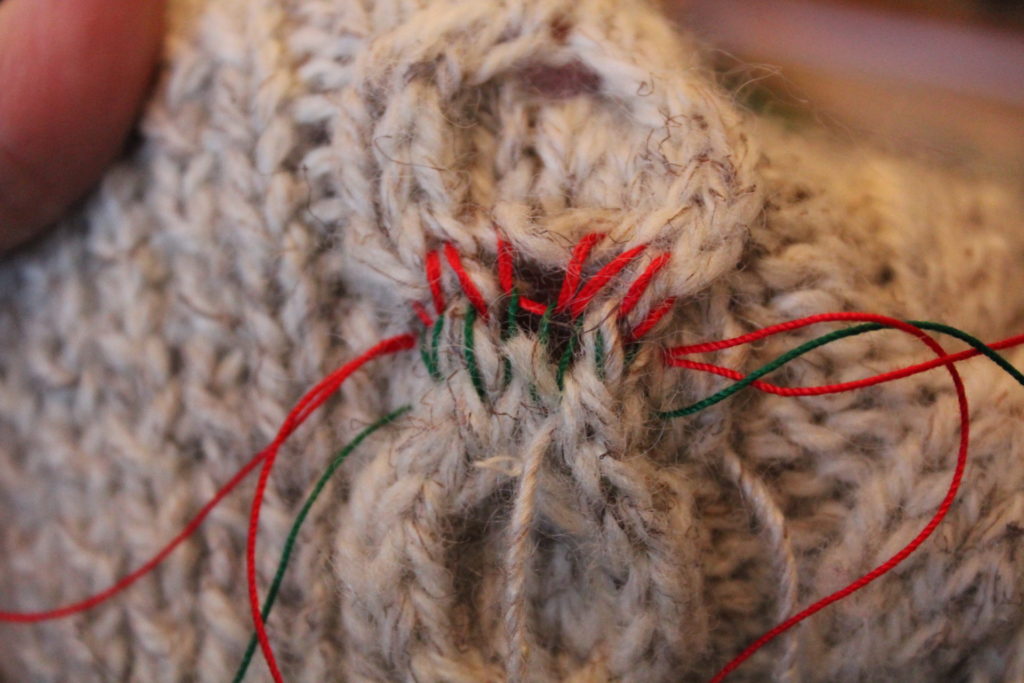
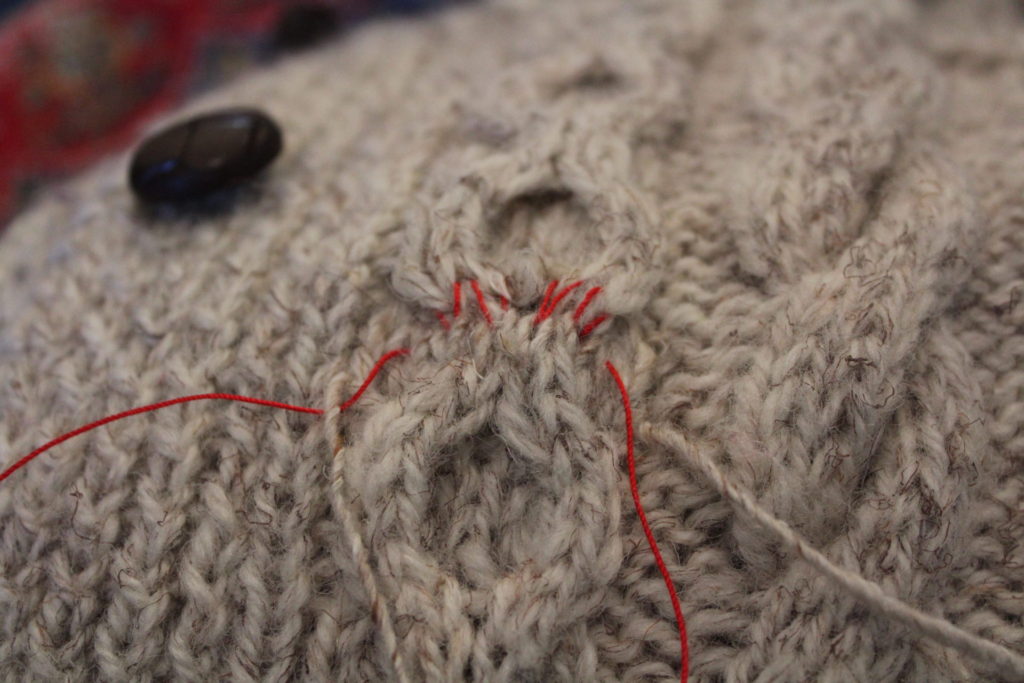
Because the yarn was awfully fuzzy, and hard to see what I was doing, I did a step I sometimes skip.  I ran guidelines: a different color of crochet thread for each row.  Because it’s the holidays, I decided to go with red and green.  I then unpicked the old yarn, pulling it out of the way.

Sweater repair with guidelines.

Sweater repair with guidelines.

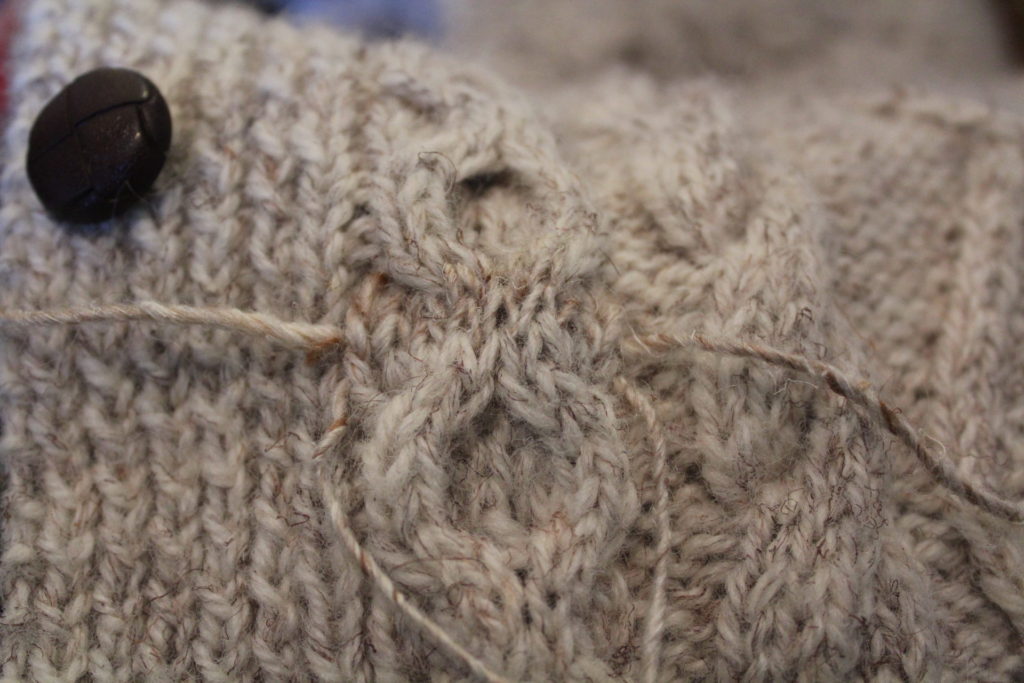
I began tracing the yarn with the Noro Silk Garden.  My only complaint about Noro is that it’s really easy to pull apart, being a single-ply.  It was also a fraction less lofty than the original yarn, but the color matching was so perfect I didn’t care, as the repair was only 4 stitches across.  I ran the first row of yarn, adjusting the stitches to make sure they matched the gauge of the stitches around them.  Then I pulled out the green guideline.  It’s one of the reasons I love crochet cotton: it pulls out REALLY easily, and is nearly unbreakable without scissors.

Sweater repair half done, only red guidelines remain.

Sweater repair half done, only red guidelines remain.

I then ran the second set of yarn, and pulled out the red yarn.

Sweater repair, needing ends woven in.

Sweater repair, needing ends woven in.

See how nice the color match is?  Just let me be geeky for a moment – the under-color is SO close, and the flecks of brown is SOOO close too.  You’d really have to be looking to notice this.

Then got down to the tedious part: weaving in the old ends and the new ends, tweaking things as I go.

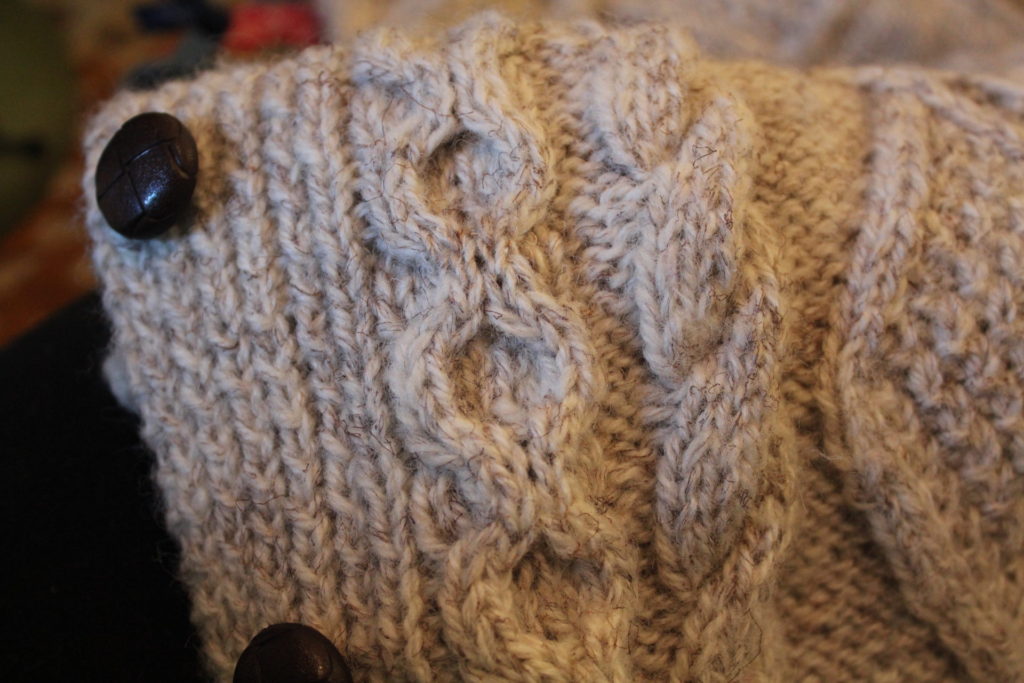
Sweater Repair, finished.

Sweater Repair, finished.

Can you spot the repair?  Yes?  Well then, I ask you.

How about now?

Sweater Repair, big view

Sweater Repair, big view

As always, if you’re looking to have a knit piece repaired, get in touch with me on my Finishing Page.  Got questions?  I’d love to hear from you.  Comment, or drop me a note!

Repair and Restoration: Behind the Scenes

Last Thursday I had a lovely surprise: Jeanne Huber, a reporter in the Washington Post, quoted me heavily in answer to a question about repairing an afghan.  She had been asked a question: was there a way to get the holes in her afghan repaired?  Huber called Fibre Space (one of the yarn stores I often teach at), who in turn recommended her to me.  Huber had gotten in touch with me on a Friday afternoon, and between packing up to leave for a long weekend, I chatted to her on the phone about how I do repair.

Huber did a lovely job with the article, taking my rambling replies and distilling them into the pertinent information.  As a result, I’ve been able to chat with a number of people looking to have family pieces repaired.

Still, it left me realizing that there’s a bit of mystery to what I do, and I wanted to expand a little upon the article.

20479758521_1a7f106415_b

Blanket in the process of being repaired

How I Approach Repair Work

When someone gets in touch with me looking to get an item fixed, I try and have a dialogue with the customer about their goals.  What is it they want from the repair?  What would be the ideal results for them?  Are they looking to have an item repaired so they can use it further or are they looking to have the holes fixed so that the problem doesn’t get worse?  Are they on a budget?   Are they looking for the item to look pristine or are they willing to allow the repair to become part of the character of the object?

Each person has a different idea of what “fixed” means.

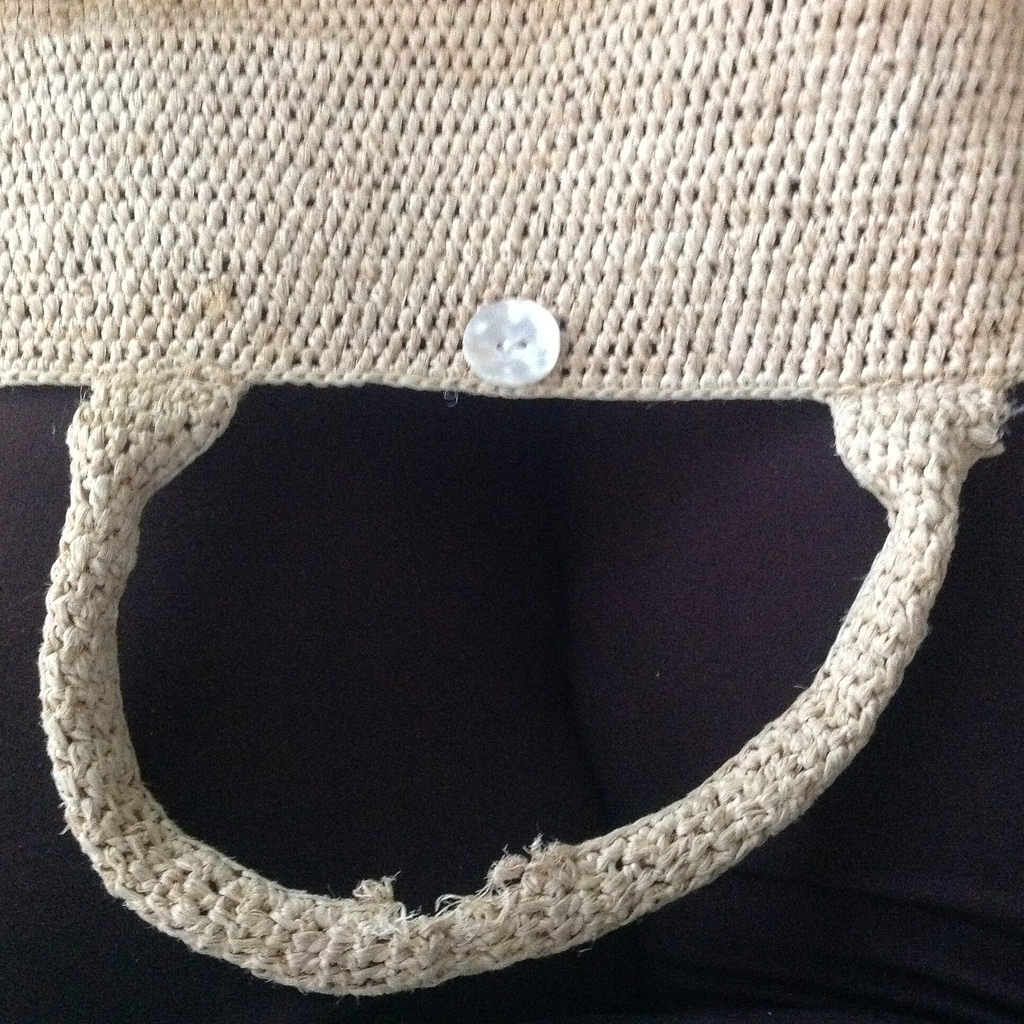
21831892331_7742a4b943_bMeanwhile, I’m also looking at the practical part of the project.  How damaged is the item?  How widespread is the wear?  Would attempting to fix the item hurt things further?  When I’m looking into this I’m often learning about the history of the item: if it was stored in a place where a lot of sunlight, heat or humidity could get to it, the fibers may be damaged.  Are the places where wear is showing from use – such as worn out fingers on mittens, or a handle on a bag becoming worn, or because of a different factor?  Often the answers form the type of repairs I can do – mittens that are going to get further wear over each winter are going to receive different treatment than a Christmas stocking that’s taken out once a year.

Based on the customer’s feedback, I come back with a number of options.

Sometimes this means the repairs are visible repairs: so that the owners can show where the original piece is, and where the repairs are.  Sometimes this means we transform a piece: adding a cute embroidered kitten over an elbow patch.  Other times the repairs are nearly invisible as I splice new yarn into the old.

Just as I put time and thought into repairing damaged items, so can you put the time and thought into what you want from your repair.  Worried that a piece of yours might need help?  Check out my post on what to look for.  Already decided to have your piece fixed?  Get in touch with me through my finishing form– I’d love to start our conversation!